Configure a Data Collection Job
The configuration of a data collection job involves the step-be-step configuration of each individual pre-processing step you had selected during the creation of the specific data collection job.
Configure the Harvester Step
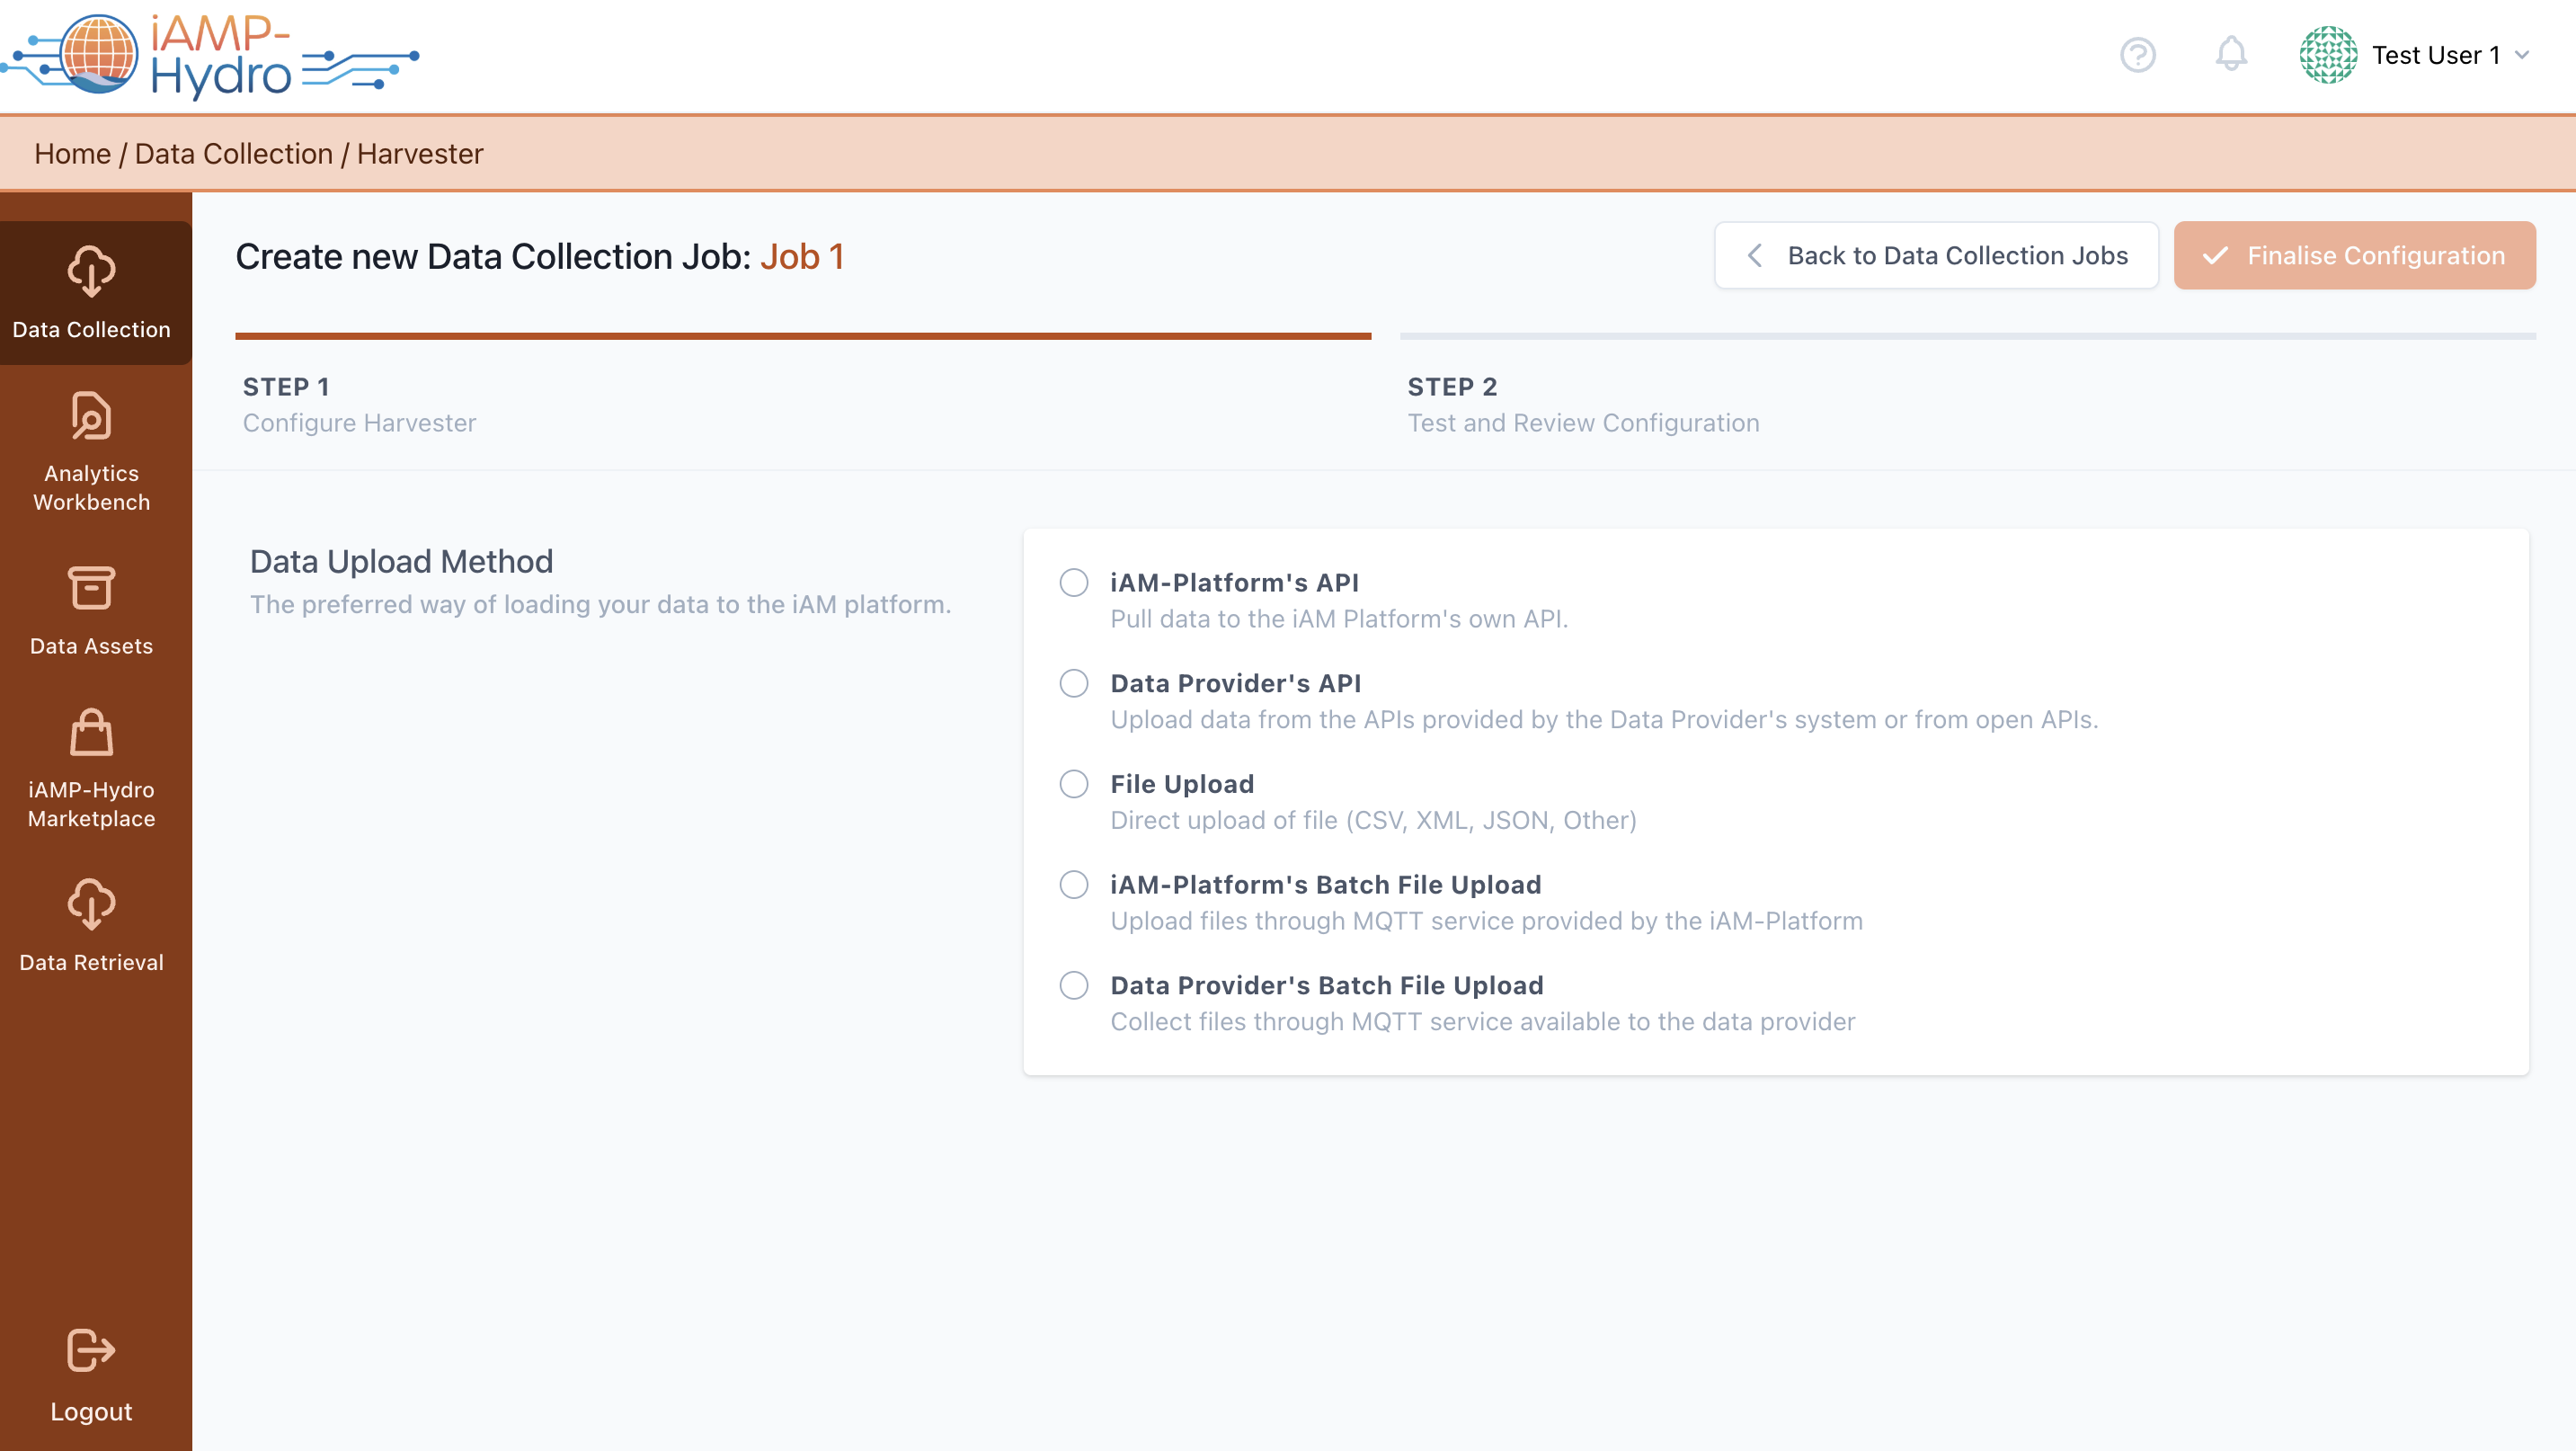
Initially, setting up the Harvester is essential. This involves choosing the relevant Data Collection Job from the list and then selecting the Harvester configuration. This step is crucial as it defines the method of data ingestion to be used for uploading data onto the iAM Platform As illustrated in the figure, the data loading method can be selected as follows:
- File upload
- Direct file uploads in formats such as CSV, JSON and XML.
- iAM Platform's Batch File Upload
- Publish streaming data using the PubSub mechanisms (MQTT) provided by the centralised platform.
- Data provider's Batch File Upload
- Collect streaming data through PubSub mechanisms (MQTT) available to the data provider.
- Data provider's available API
- Gather data from APIs offered by the data provider's applications and systems or from open APIs.
- iAM Platform's API
- Upload data directly to the centralized platform's APIs.
After choosing the suitable harvesting method, you can finalize the configuration of the data harvester. Following this, you will be directed to the subsequent step in the process.
Hint
If you are uncertain about which Harvesting Method to select, you have the option to click on the "Back to data Collection Jobs" button and return at a later time to complete the setup.
Hint
If you have data in various formats or accessible through different methods, you should create and complete separate Data Collection Job for each scenario.
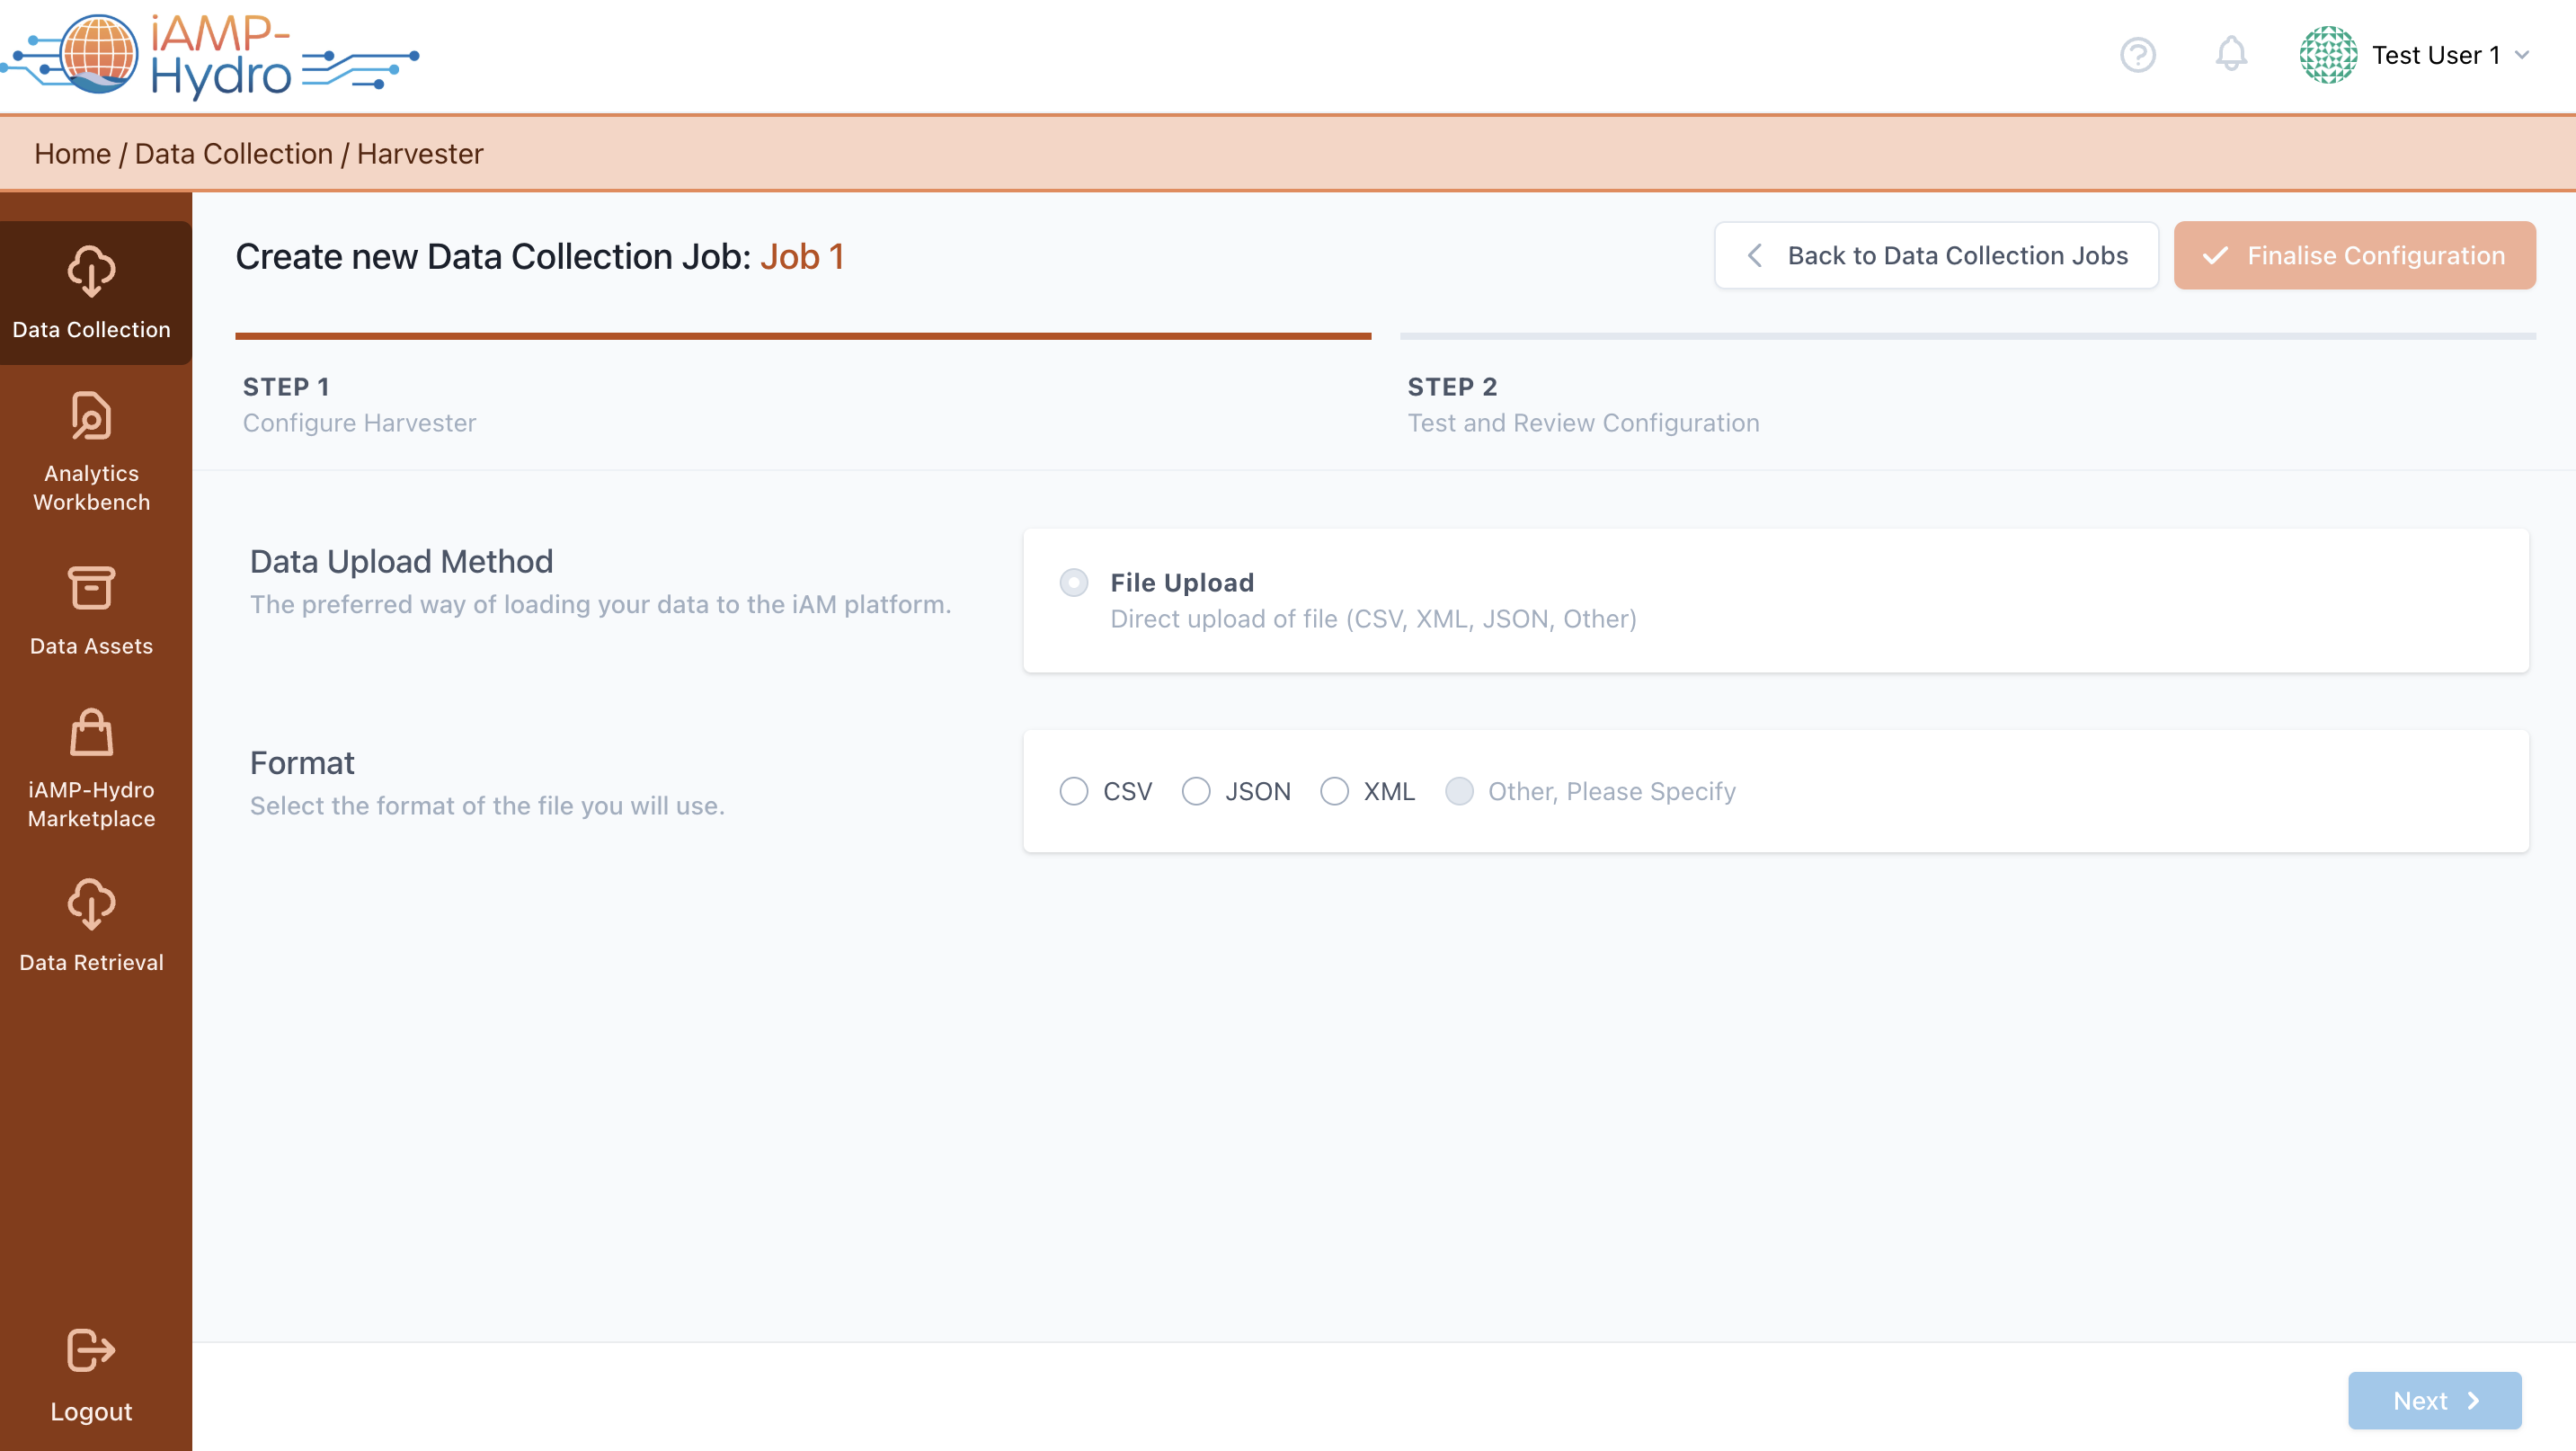
File Upload
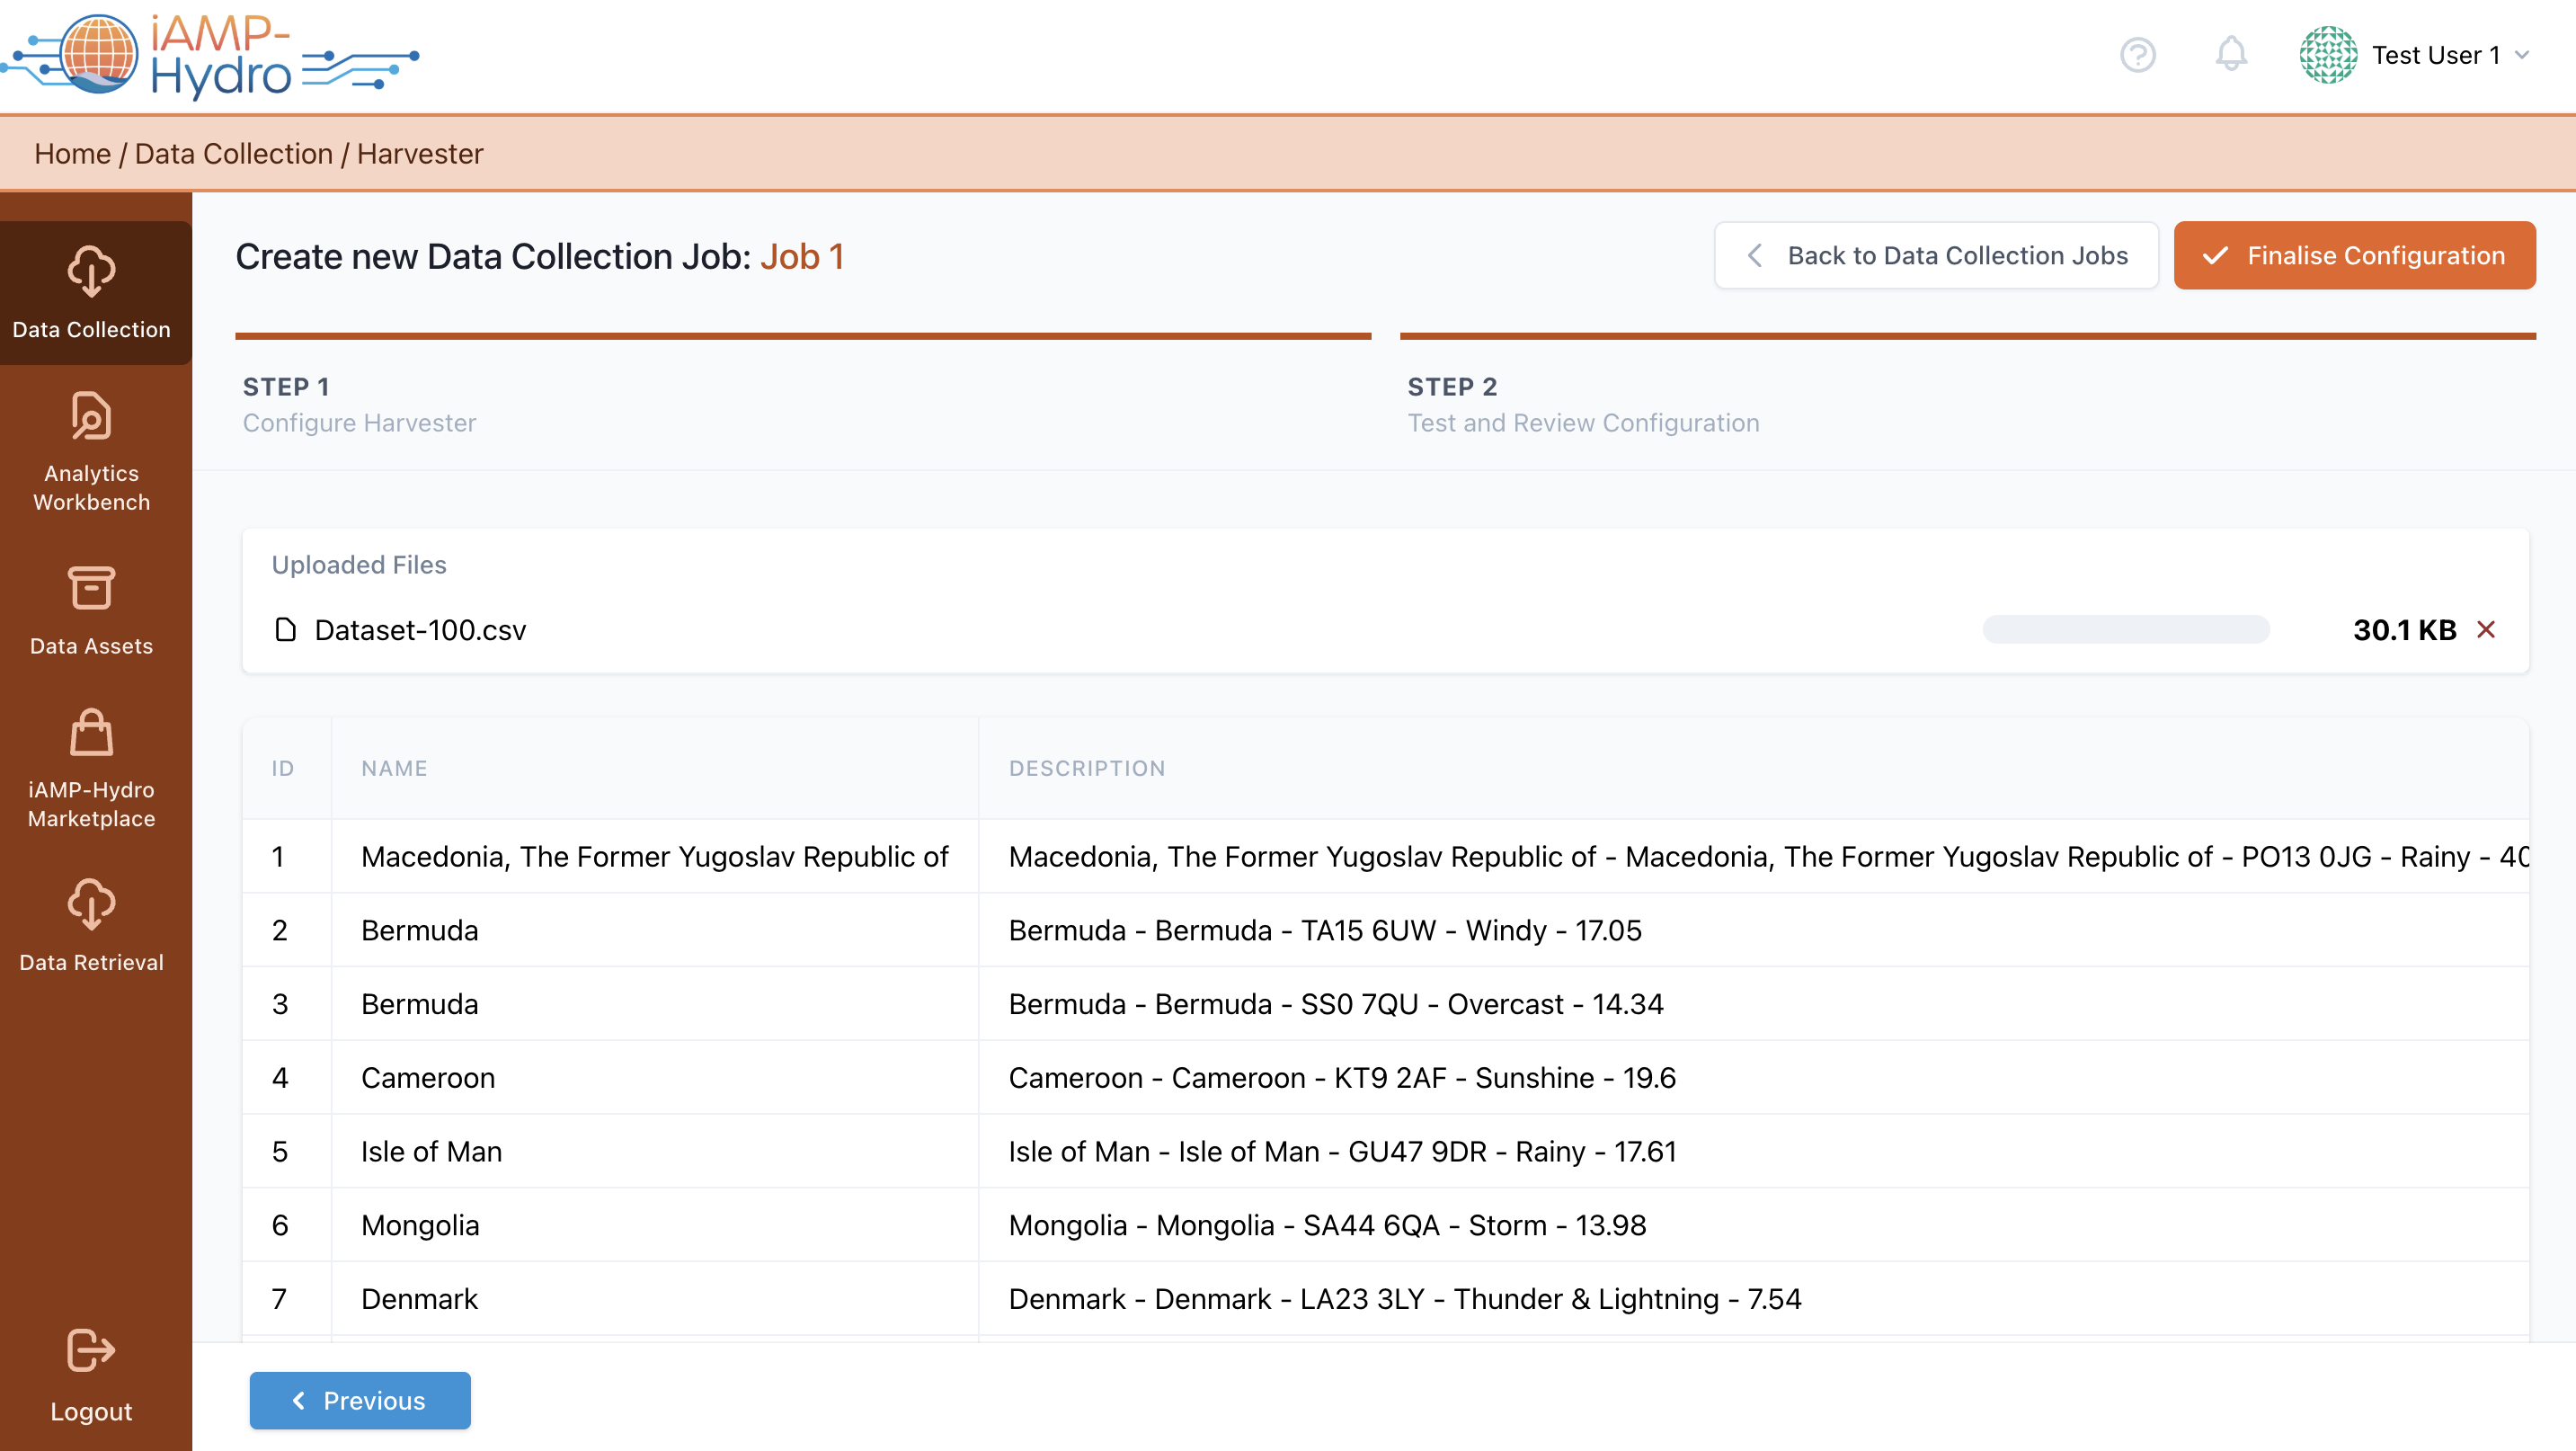
In the harvester configuration page, you need to specify the file format of the data to be uploaded, choosing from options such as CSV, JSON or XML. Subsequently, you are required to upload a sample file containing a representative number of entries from the complete data asset, along with the actual file intended for upload.
Hint
The sample file can be a piece of the original file to be uploaded. In the case of csv file, the first line must include each field’s name and there should not be any characters that do not follow the UTF-8 encoding in such names.
Data provider's Batch File Upload
Upon choosing the iAM Platform's batch file upload, you'll be directed to the setup page for the streaming data harvest service as shown in the figure. In this stage, it's essential to select the PubSub mechanism (e.g., MQTT) and the data format (e.g., JSON or XML) for publishing. You are then required to upload a sample of the streaming data in the chosen format (JSON or XML) to move forward to the sample review in the subsequent step.

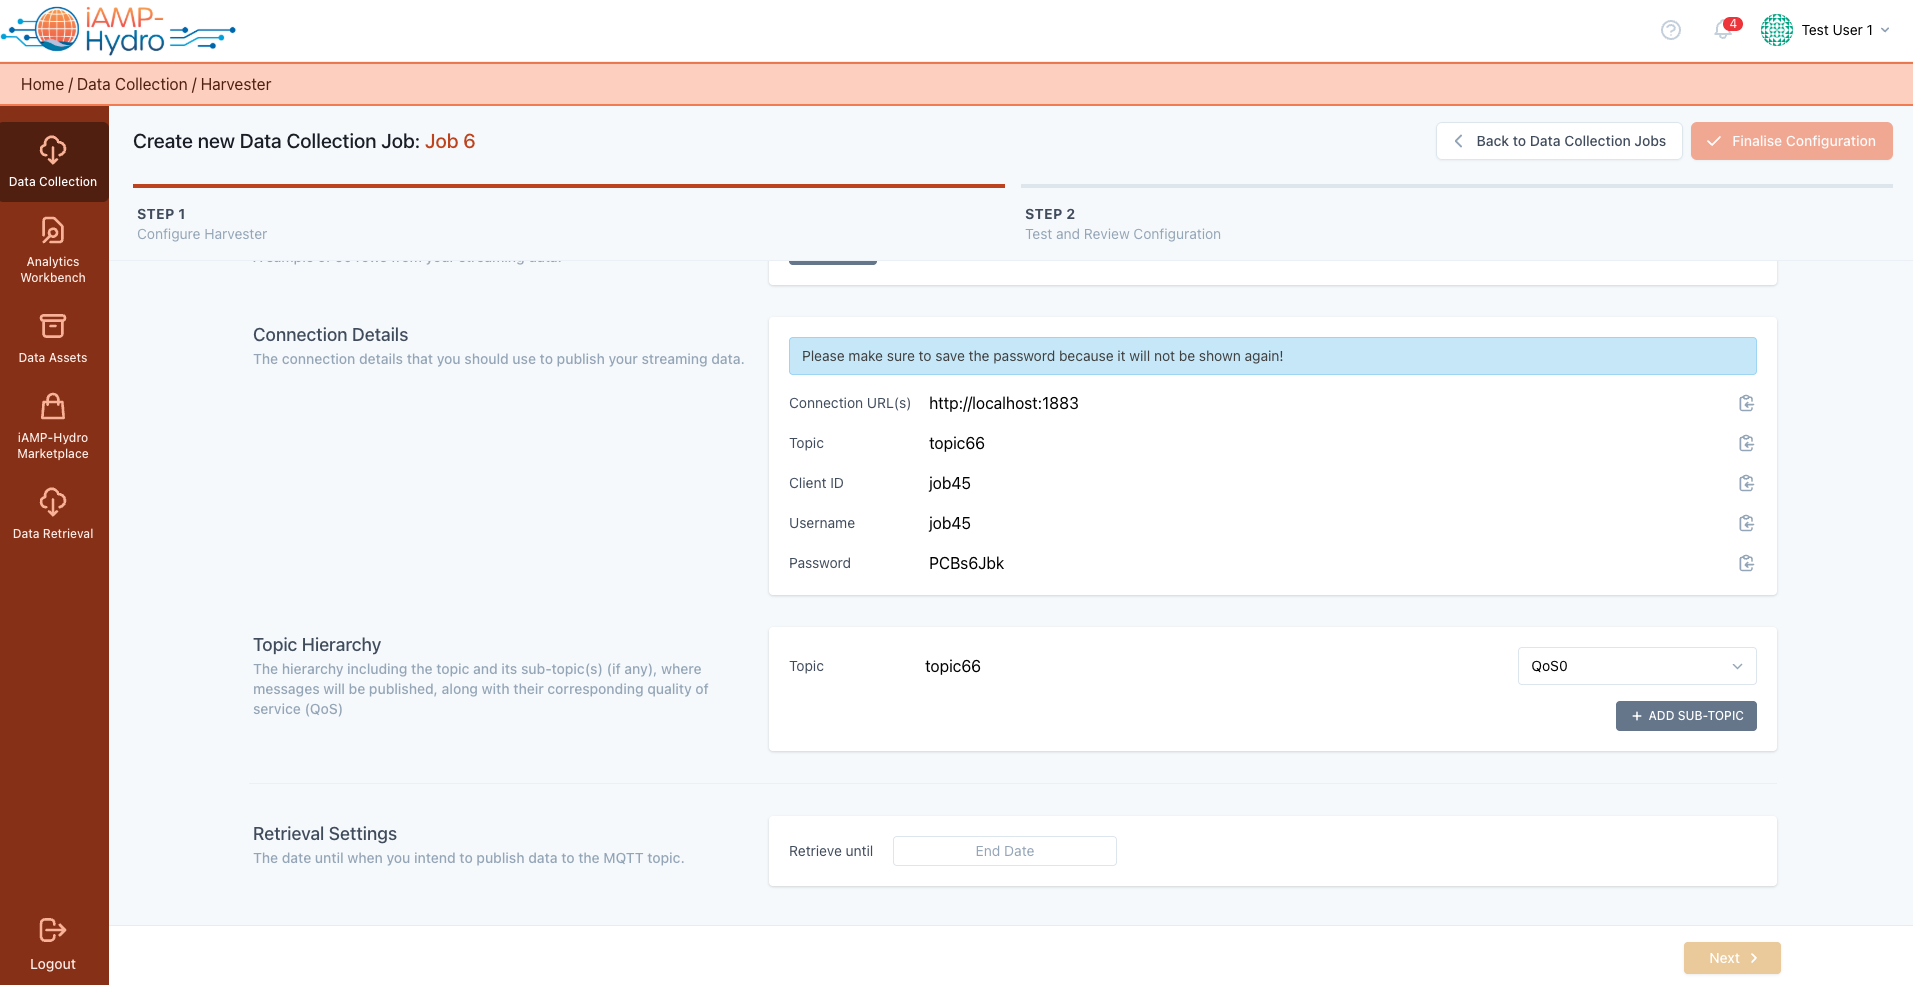
Next, provide the connection details such as the platform’s MQTT PubSub mechanism URL, the topic name for data publishing, the Security Protocol and the Simple Authentication and Security Layer (SASL) used, and the necessary credentials for publishing to the topic will be provided. Additionally, you'll need to define when the ingested data should be processed (i.e., Real Time or On Schedule) and set the streaming data retrieval's end date.
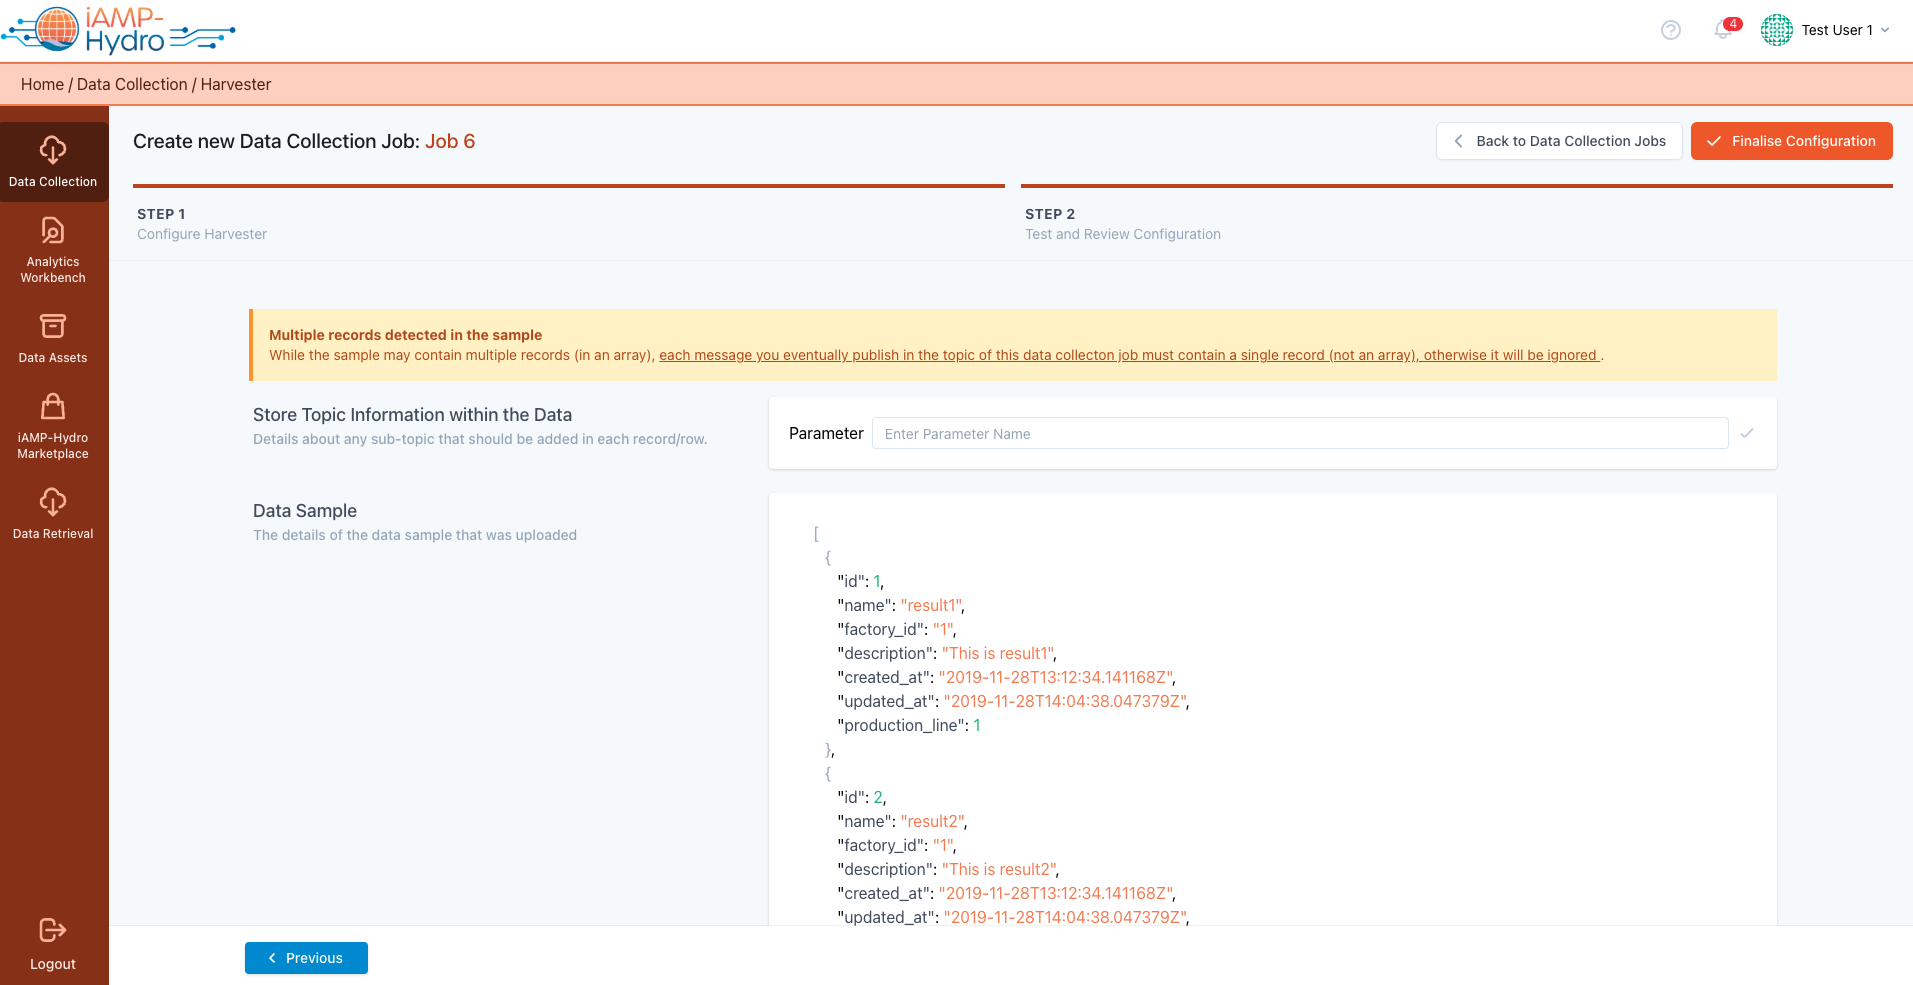
In the review phase, you can complete the setup of your harvesting configuration. This is done after inspecting the structure of your streaming data, which is presented in a tree-view format. To finalize, simply click the "Finalize" button as shown in the accompanying figure.
Hint
If the sample uploaded includes multiple records within an array, any message you publish to this Data Collection Job's topic should consist of a single record.
iAM Platform's Batch File Upload
Upon choosing the MQTT Pubsub mechanism for data harvesting, you are directed to a configuration page, to begin uploading your streaming data. You have the option to select the MQTT broker version (1) you plan to use and specify the file format for the upload, either JSON or XML. Additionally, you are provided with the necessary connection details (2) such as the URL, username, password, and Client ID, and choose a security protocol (Plain or SSL).
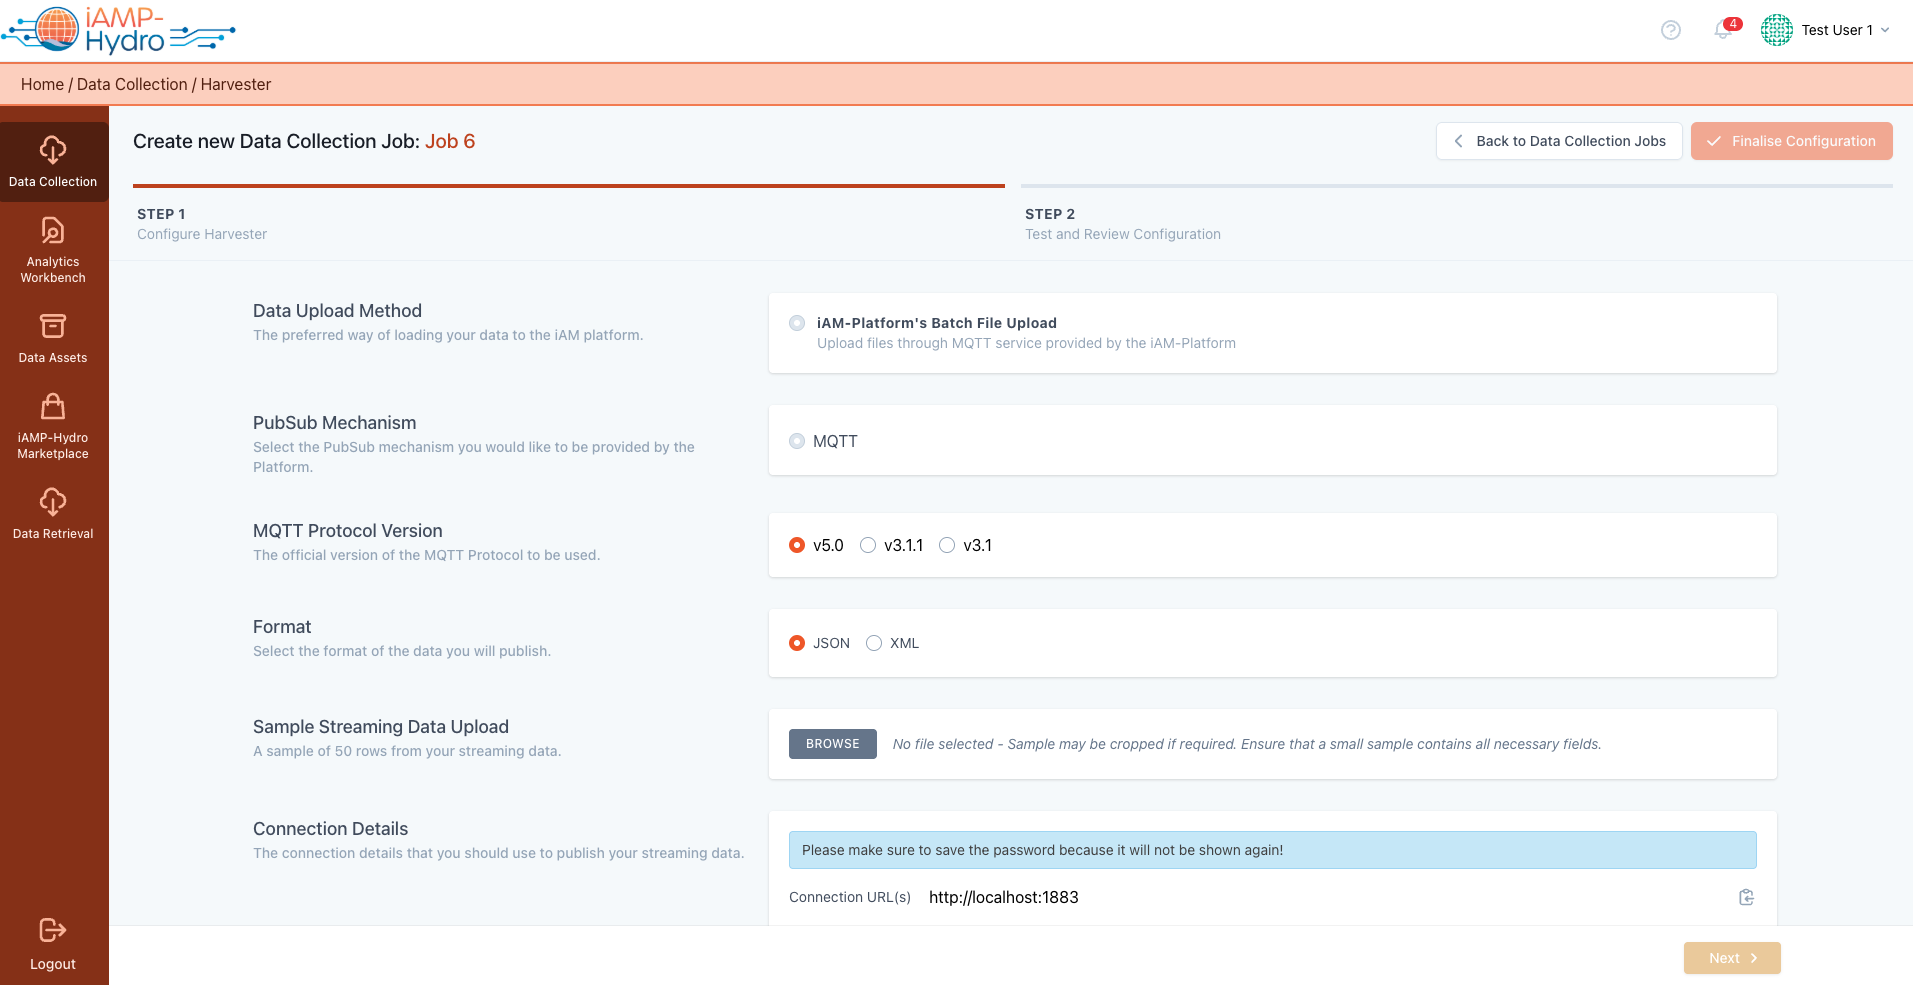
During this setup phase, it's essential to outline the message hierarchy by specifying the topic and any sub-topic(s) for message publication you will use, as well as the desired quality of service (QoS).
Furthermore, the MQTT configuration allows you to set specific retrieval parameters. You are required to upload a streaming data sample to proceed with the configuration.
Similarly to the Platform's streaming data Step 2, you are given a summary of the data sample that is uploaded, in order to rapidly examine the data that will be uploaded on the EDS.
Hint
You need to save the password presented during the configuration, because it will not be shown again.
Data provider's available API
Upon deciding to import data via an external API offered by your organization, you'll be directed to the relevant configuration page, as depicted in the figure provided. The first step involves choosing the API response format, such as JSON or XML, and specifying the authentication requirements for accessing the API (for instance, selecting 'None' if no authentication is required, 'Bearer' for token-based authentication, ‘Keycloak’ obtaining an access token from the token endpoint and including it as a Bearer token in the HTTP Authorization header or 'Custom' for APIs that utilize a custom URL for authentication).
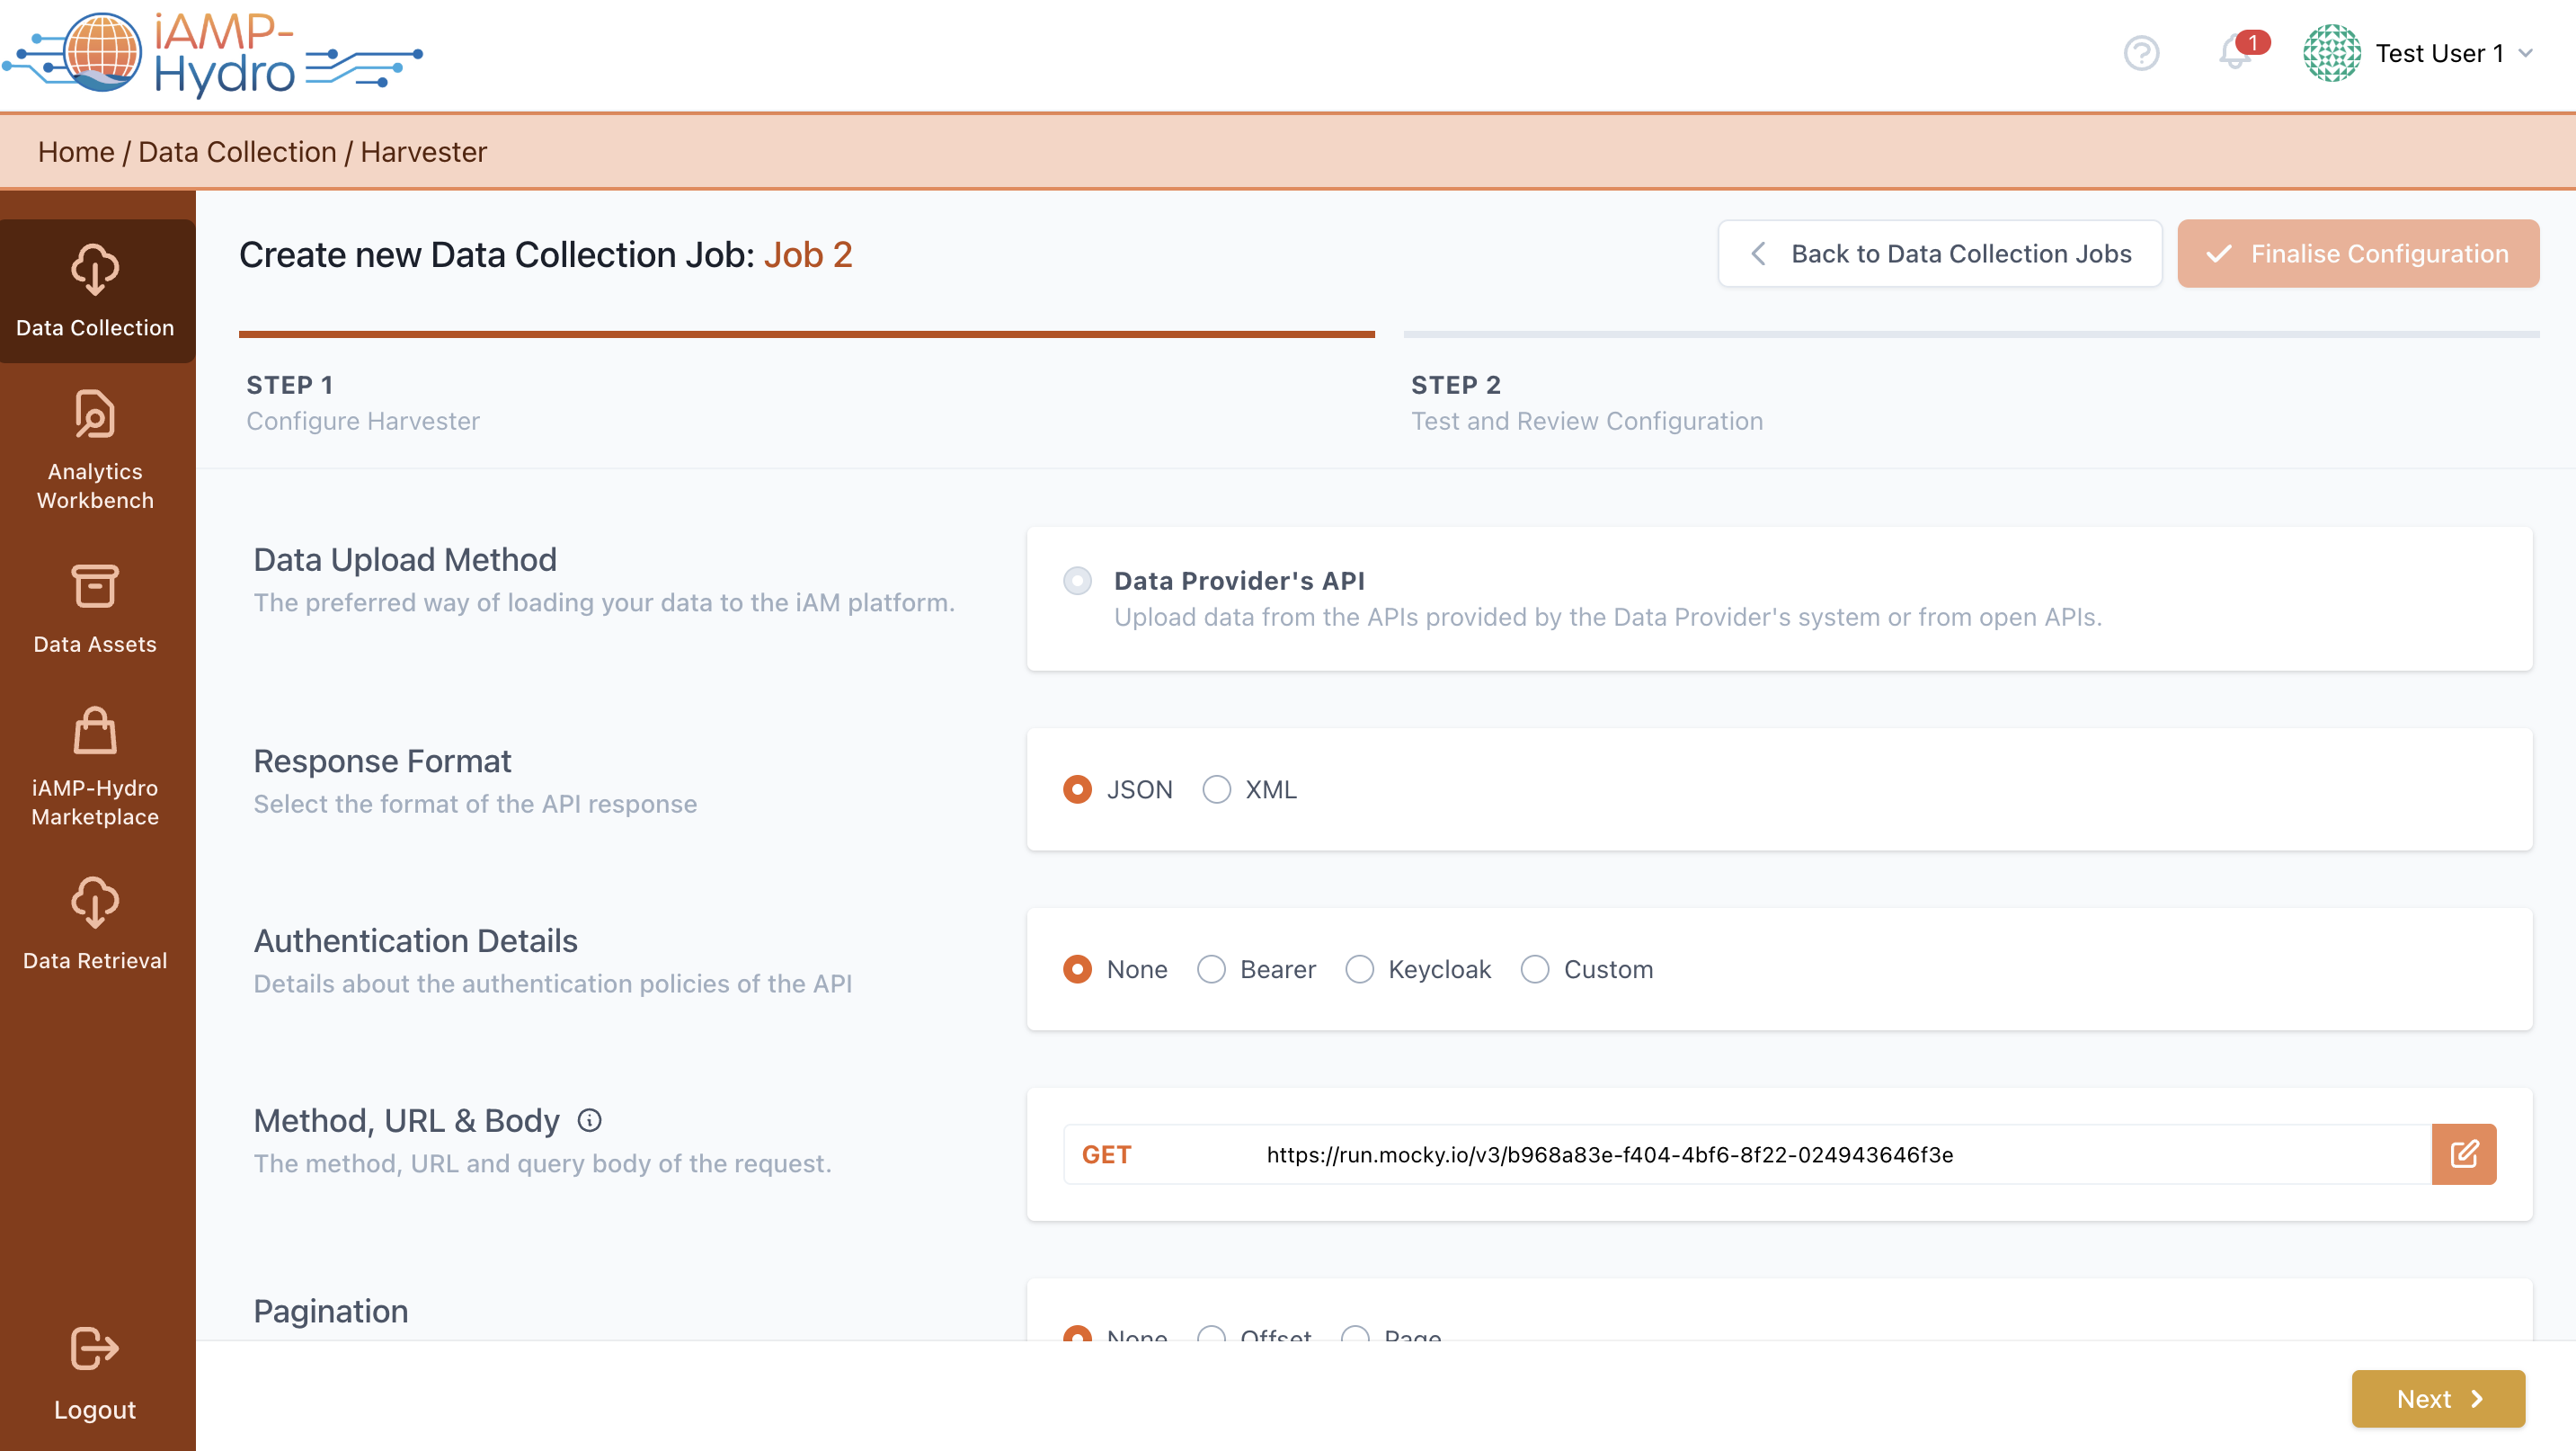
Based on the type of authentication chosen, additional information will be required. For example, with Custom Authentication, you'll need to provide the Authentication URL and the Authentication Query Body to obtain the Access Token. This setup enables you to verify the inserted authentication policies by clicking the Test Login button.
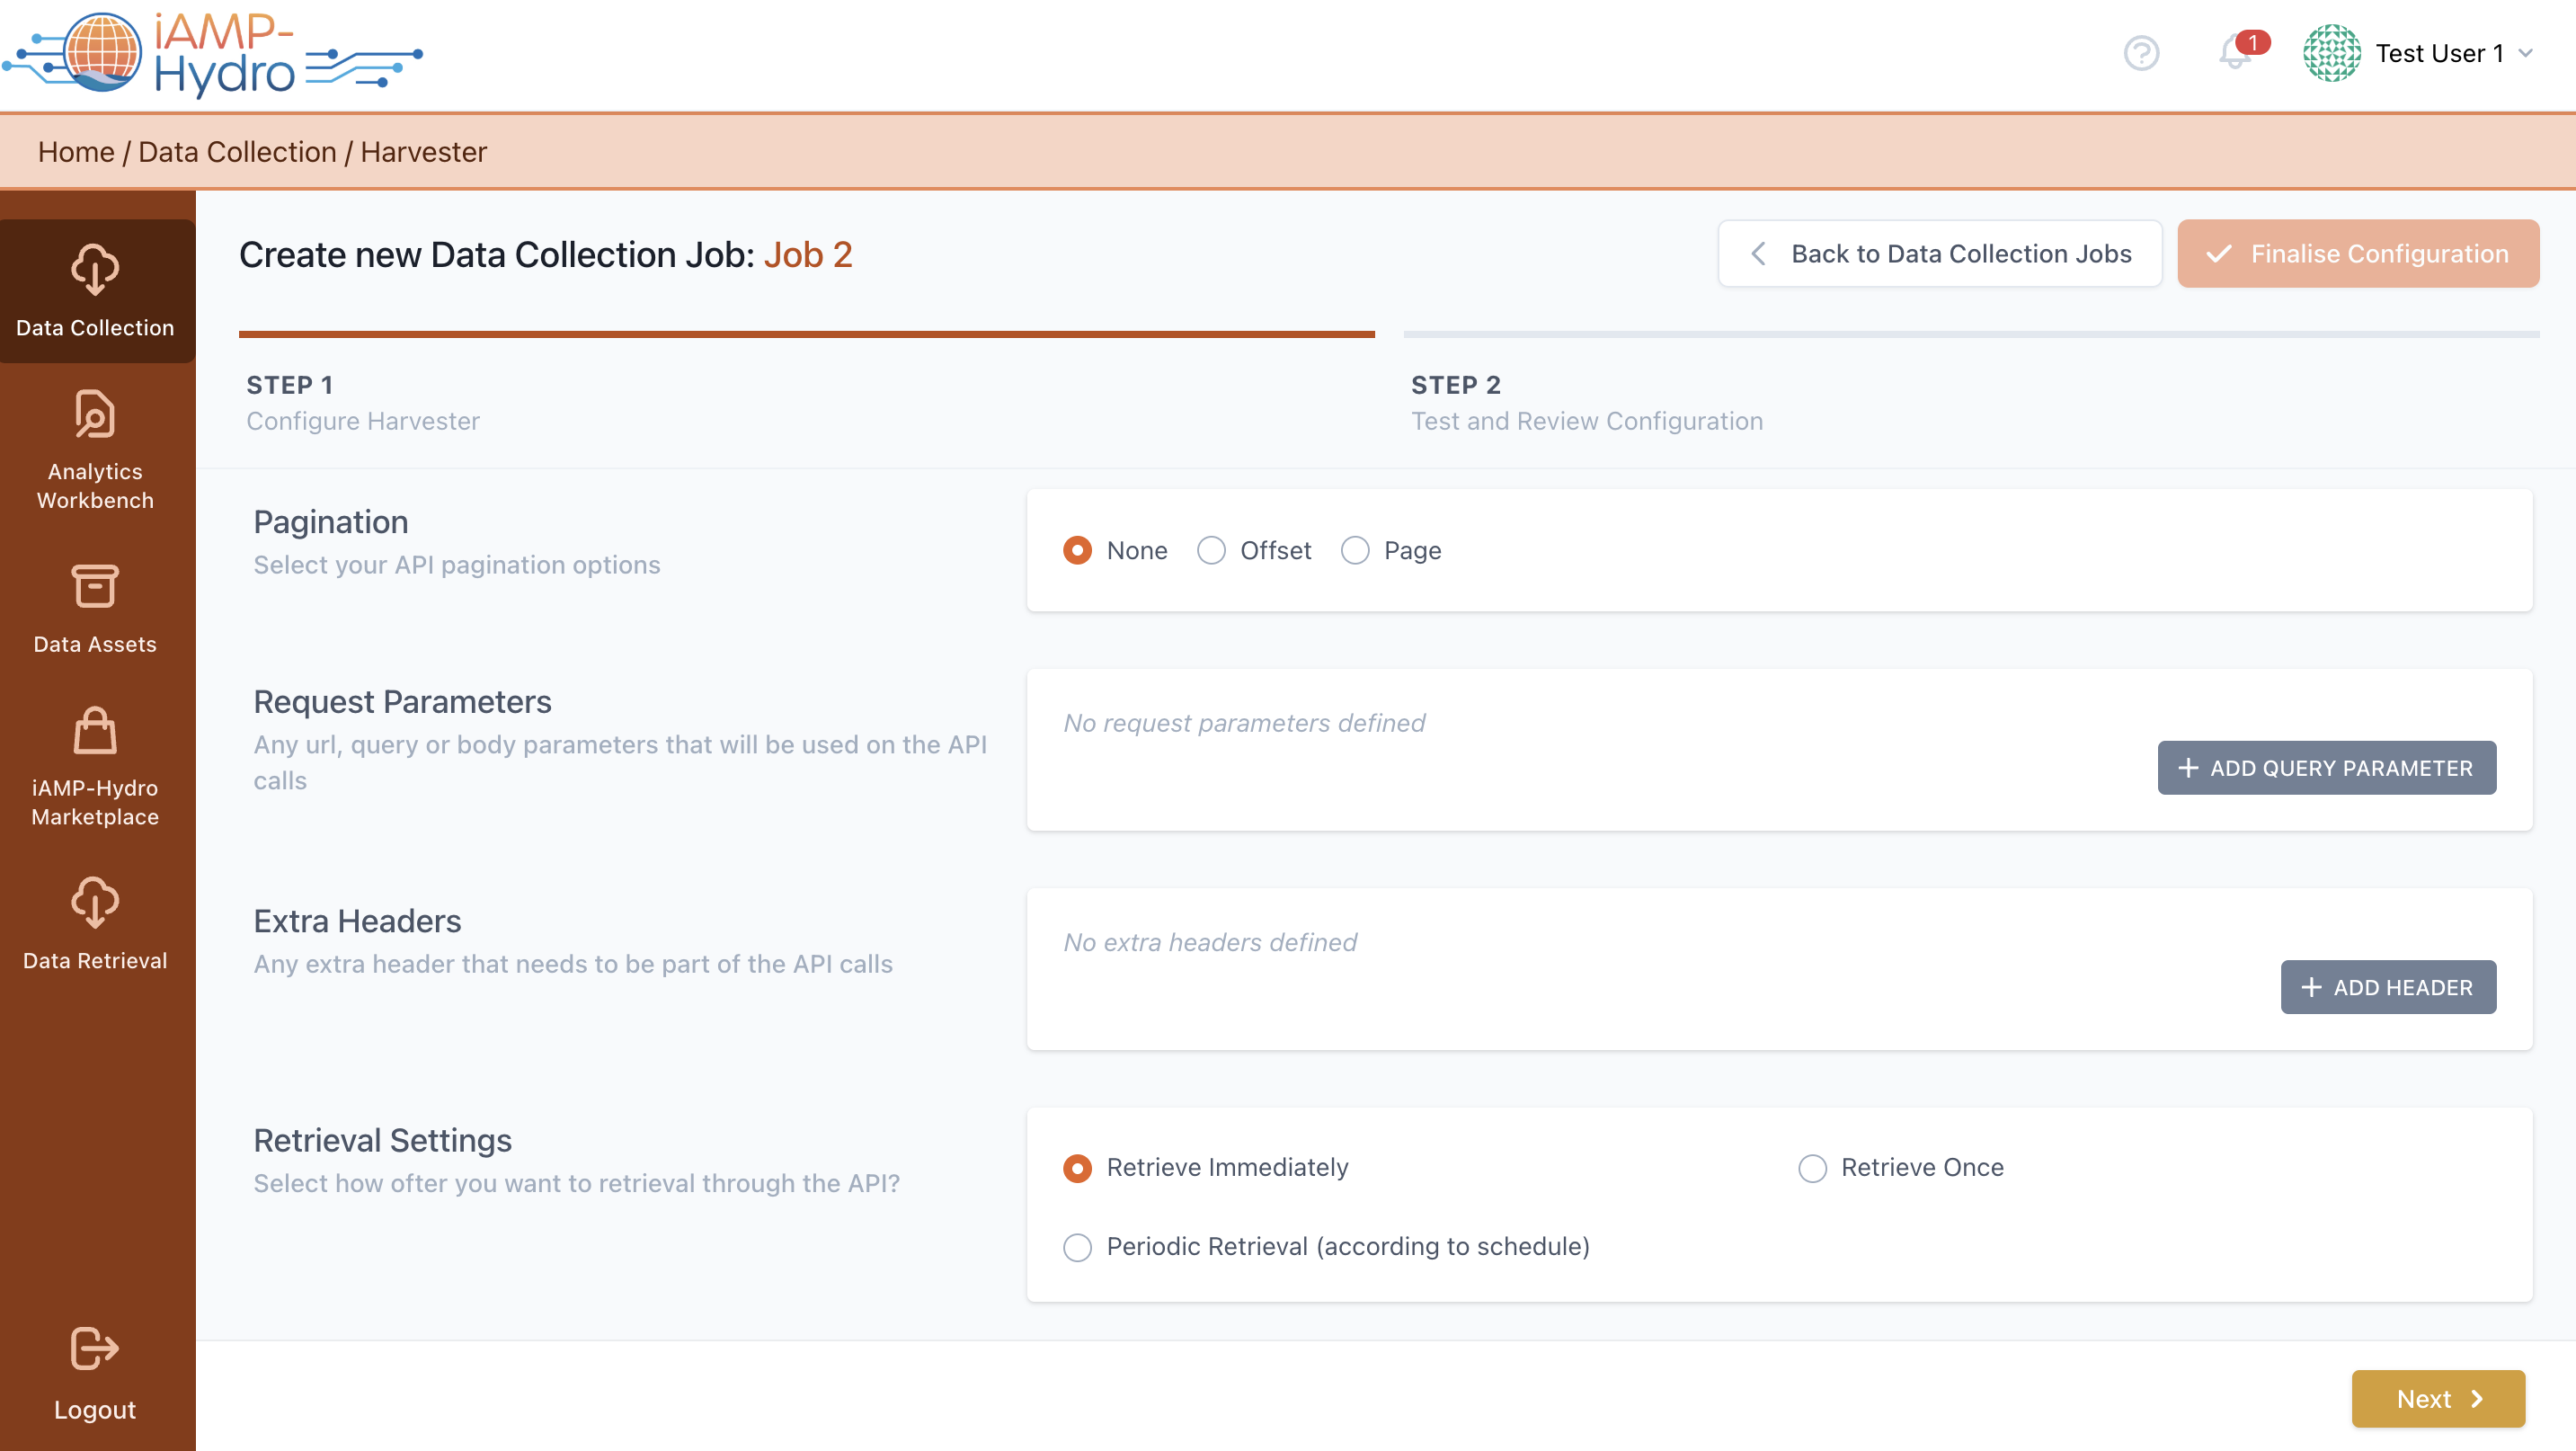
Furthermore, you must input the complete API path, which includes the base URL and the relevant method (GET, POST, PUT). For methods like POST, you will also need to supply the query body of the request. After entering the complete API path, the Request Parameters section will automatically populate with the existing parameters, allowing for adjustments, deletions, or additions of new query parameters, as illustrated in the figure provided. Options to manage pagination in API responses, like offset or page, are available to specify handling techniques for paginated data. By inputting the API method URL and query body, relevant request parameters will be displayed in the Request Parameters sections, where there's also the possibility to include more parameters.
Furthermore, extra headers can be added to your API calls by clicking the Add Header button. Next, you need to dictate when and how often the iAM Platform will fetch data from the designated API, as depicted in the accompanying figure. Specifically, you have the option to set the frequency, which includes options such as a single retrieval, scheduled periodic retrievals, and constant polling at 60-second intervals. When opting for periodic retrieval, it's possible to tailor the schedule (or schedules) and select the retrieval frequency, whether it be hourly, daily, weekly, or monthly (e.g. Every day at 08:00). The polling method is preset to gather data every minute by default.
Hint
The time of the schedule refers to UTC timezone.
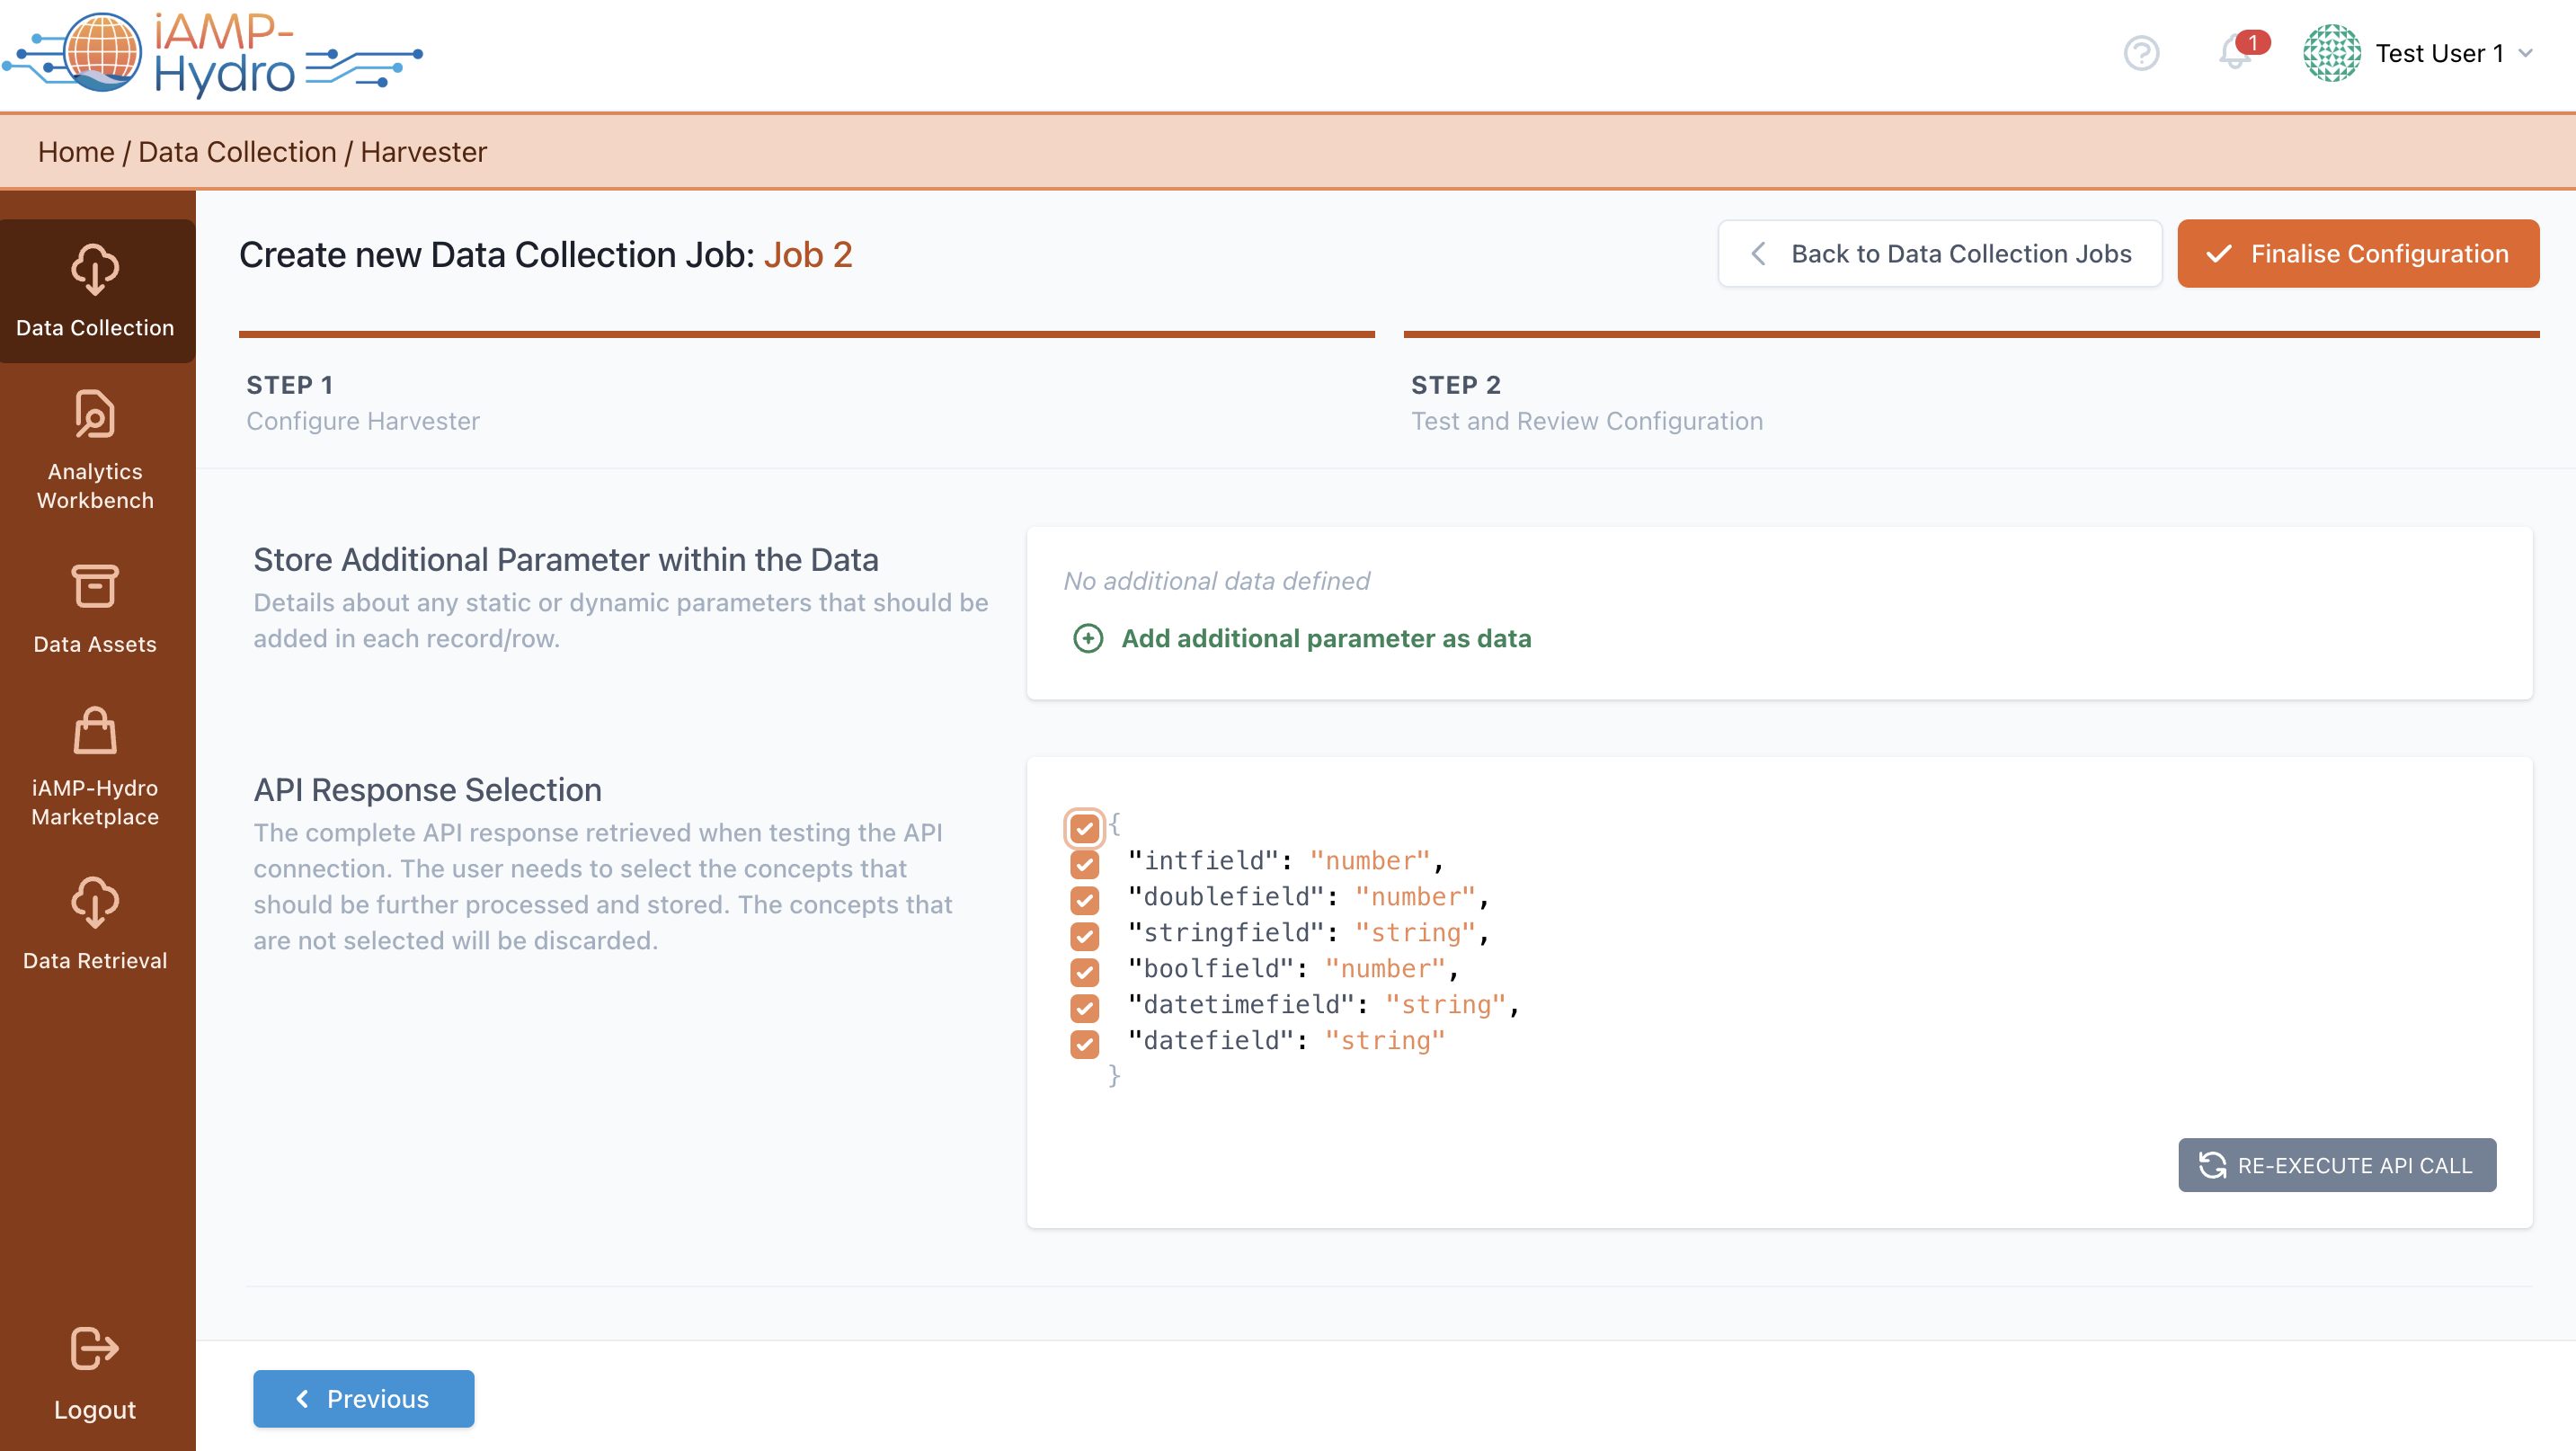
Upon clicking the Next button, the iAM Platform initiates an API request based on the configured settings. Should the API request succeed, you will be able to proceed to the Review step, as illustrated in the figure provided. Furthermore, you have the opportunity to append extra data to the response, specifying a value along with its type (e.g., static or dynamic). A static value remains constant across all API calls and is included in every response record/row, whereas a dynamic value, which could include datetime information, refreshes with each API call. Then, you can review and select the concepts for further processing and storage on the iAM Platform.
iAM Platform's API
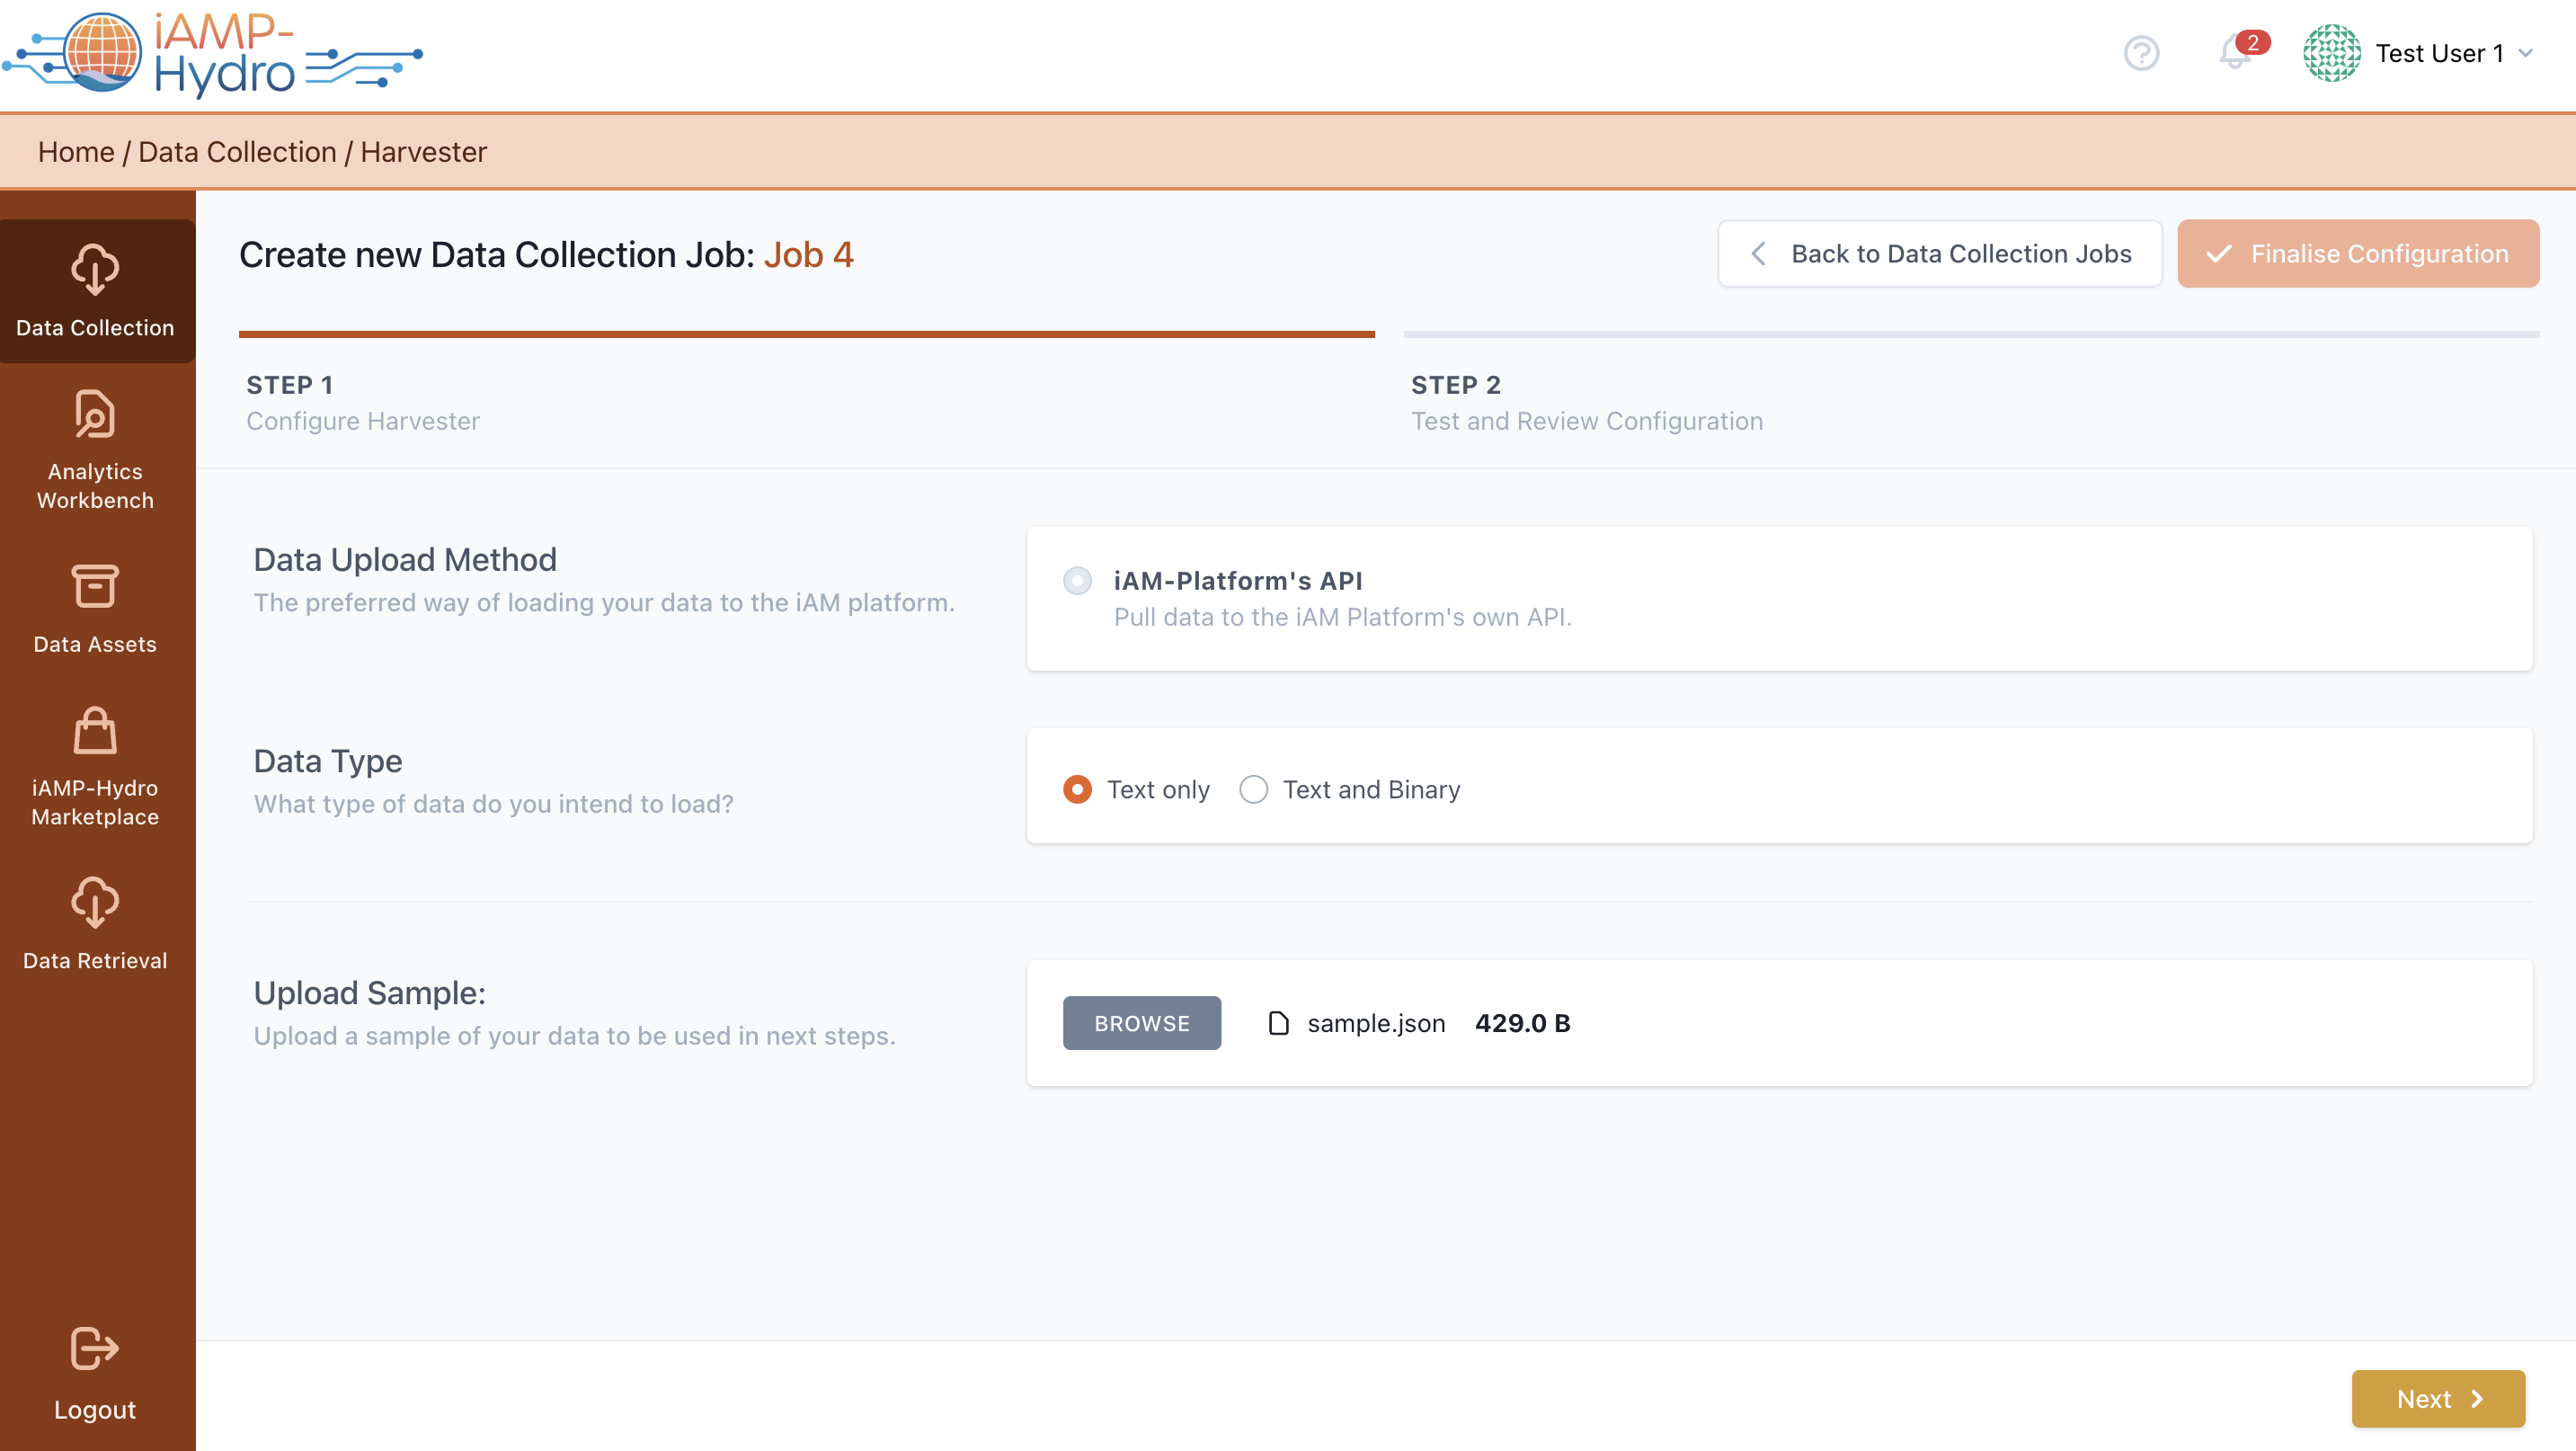
When the Platform’s API option is selected as the data harvesting method while setting up a Data Collection Job, you are redirected to its configuration page, as shown in the figure. Here, the type of data to be uploaded needs to be defined, such as text only (e.g., JSON or XML) or a combination of text and binary data (including any file format like JPG, PDF, IFC, etc.) using the provided API. Additionally, it's necessary to upload a sample file containing a representative number of entries (rows) from the “text” data intended for the iAM Platform’s API.
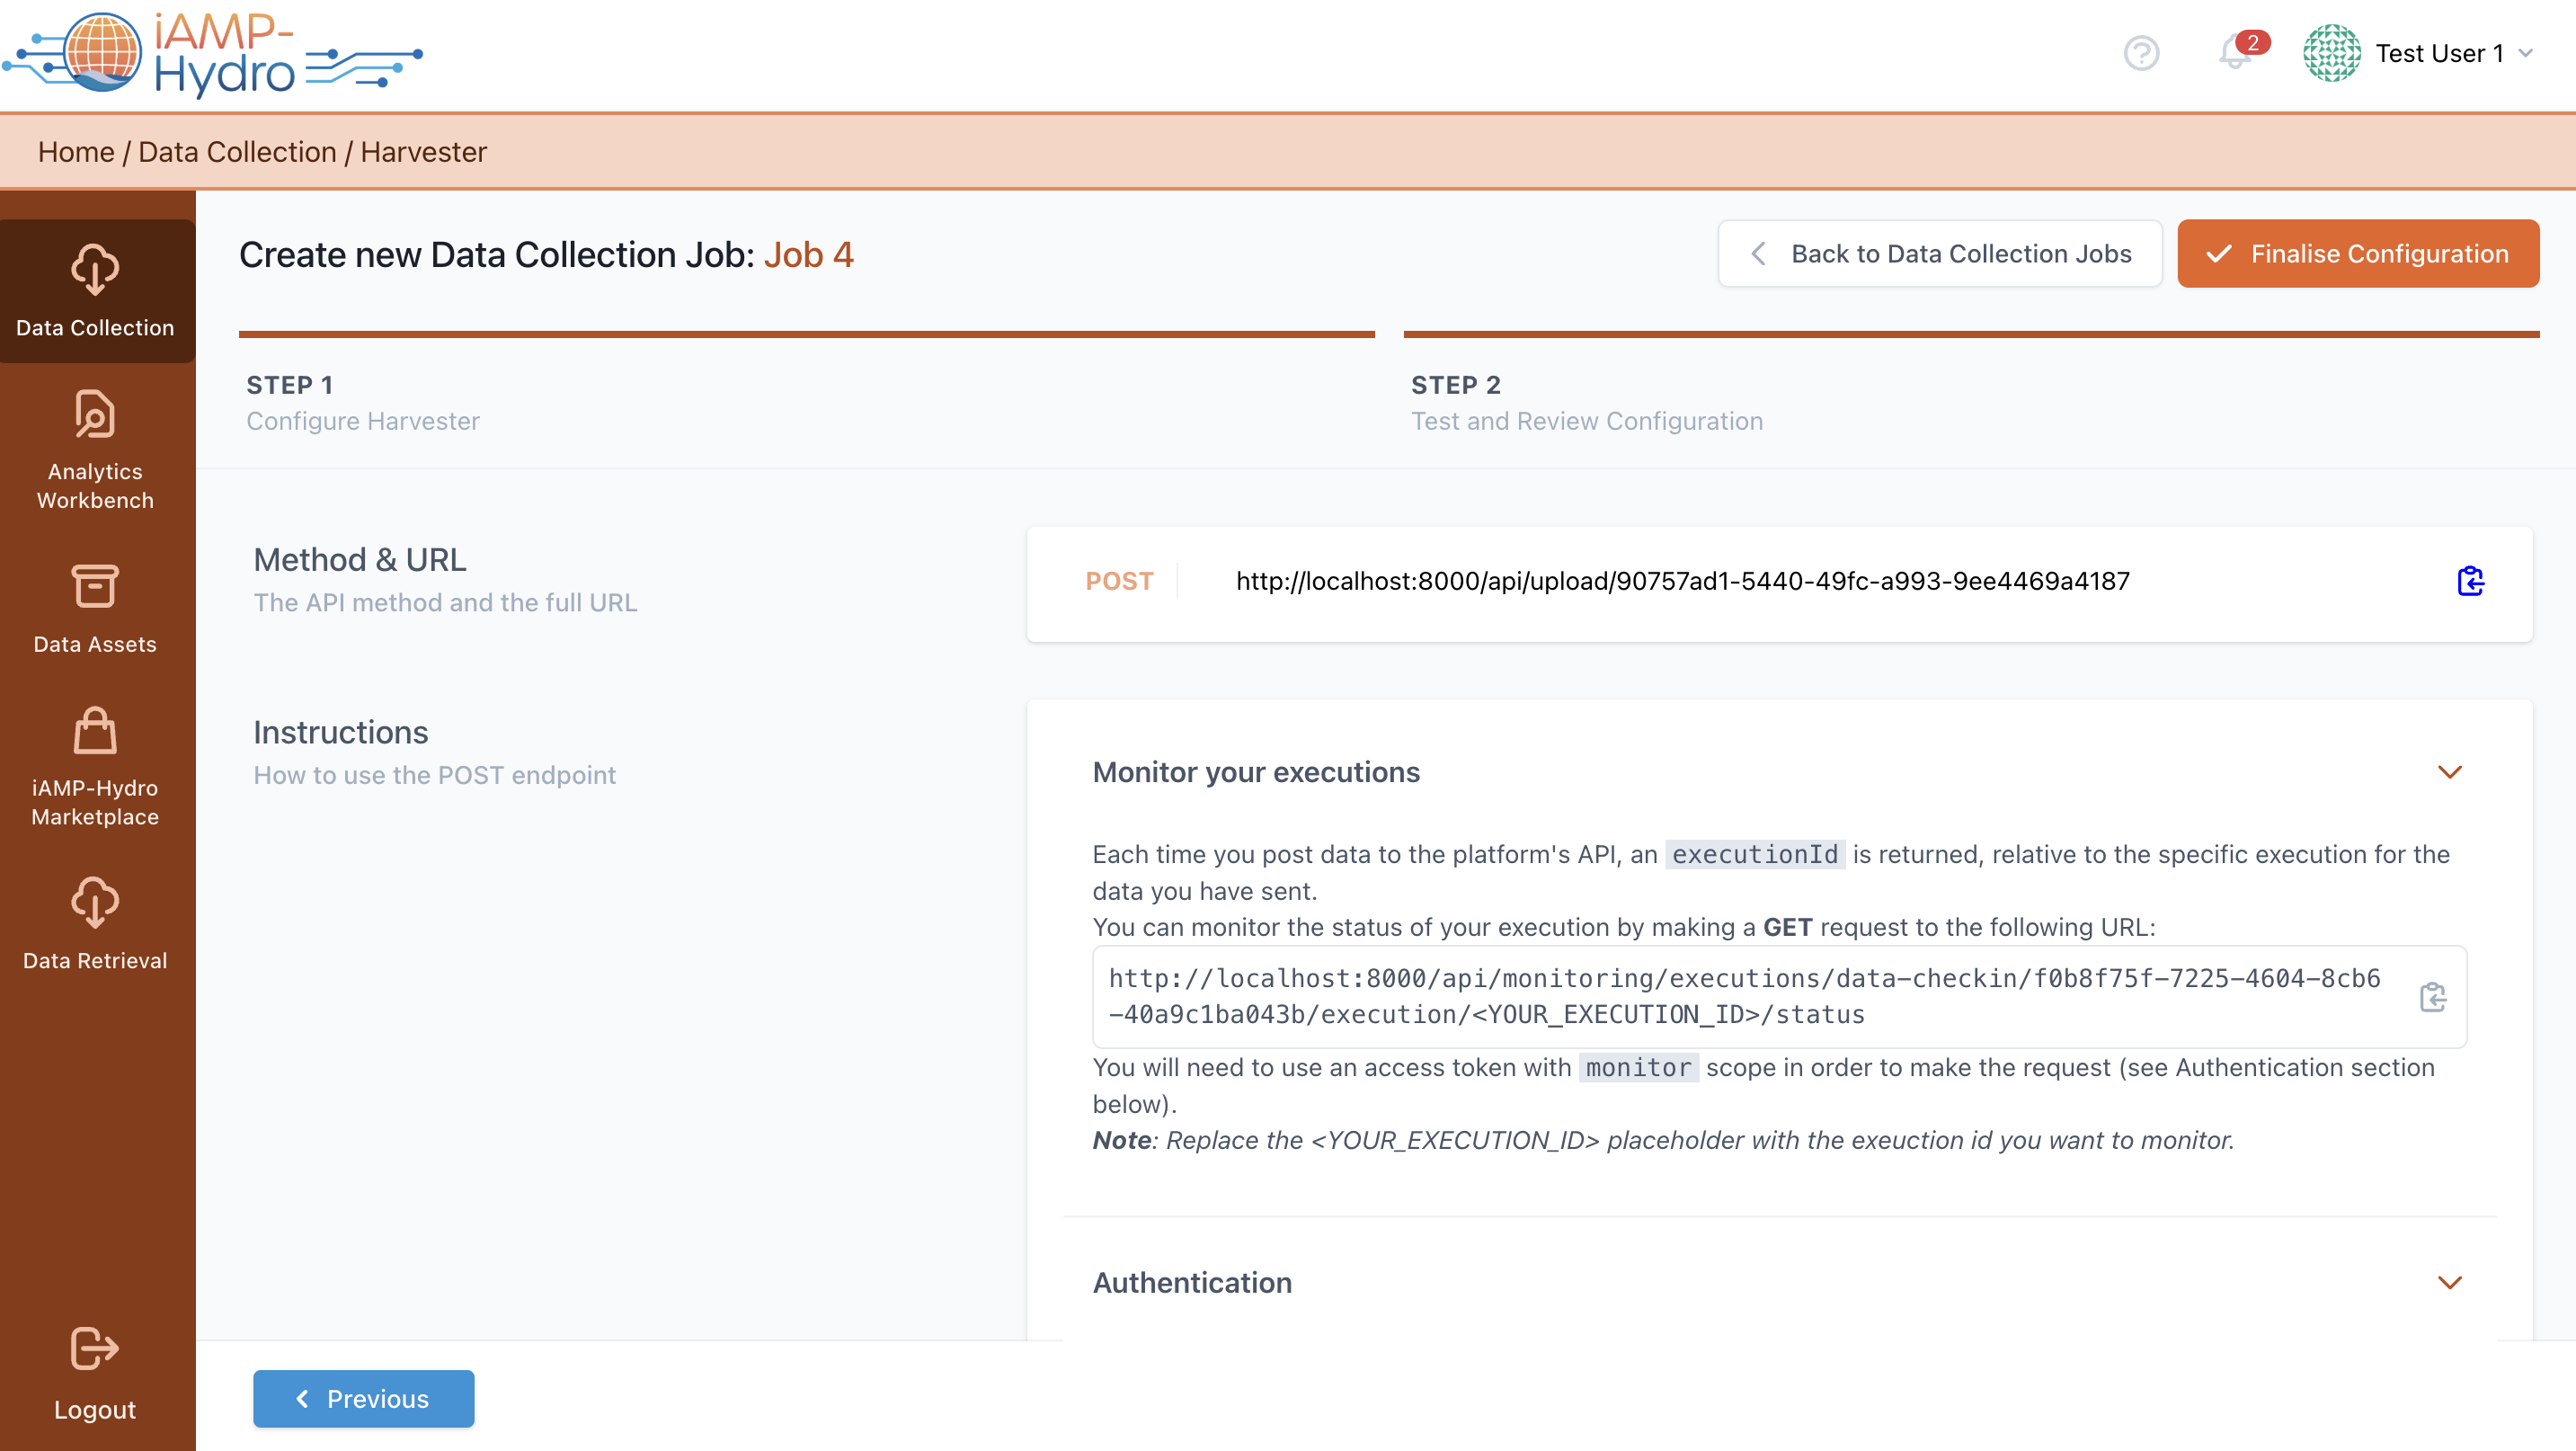
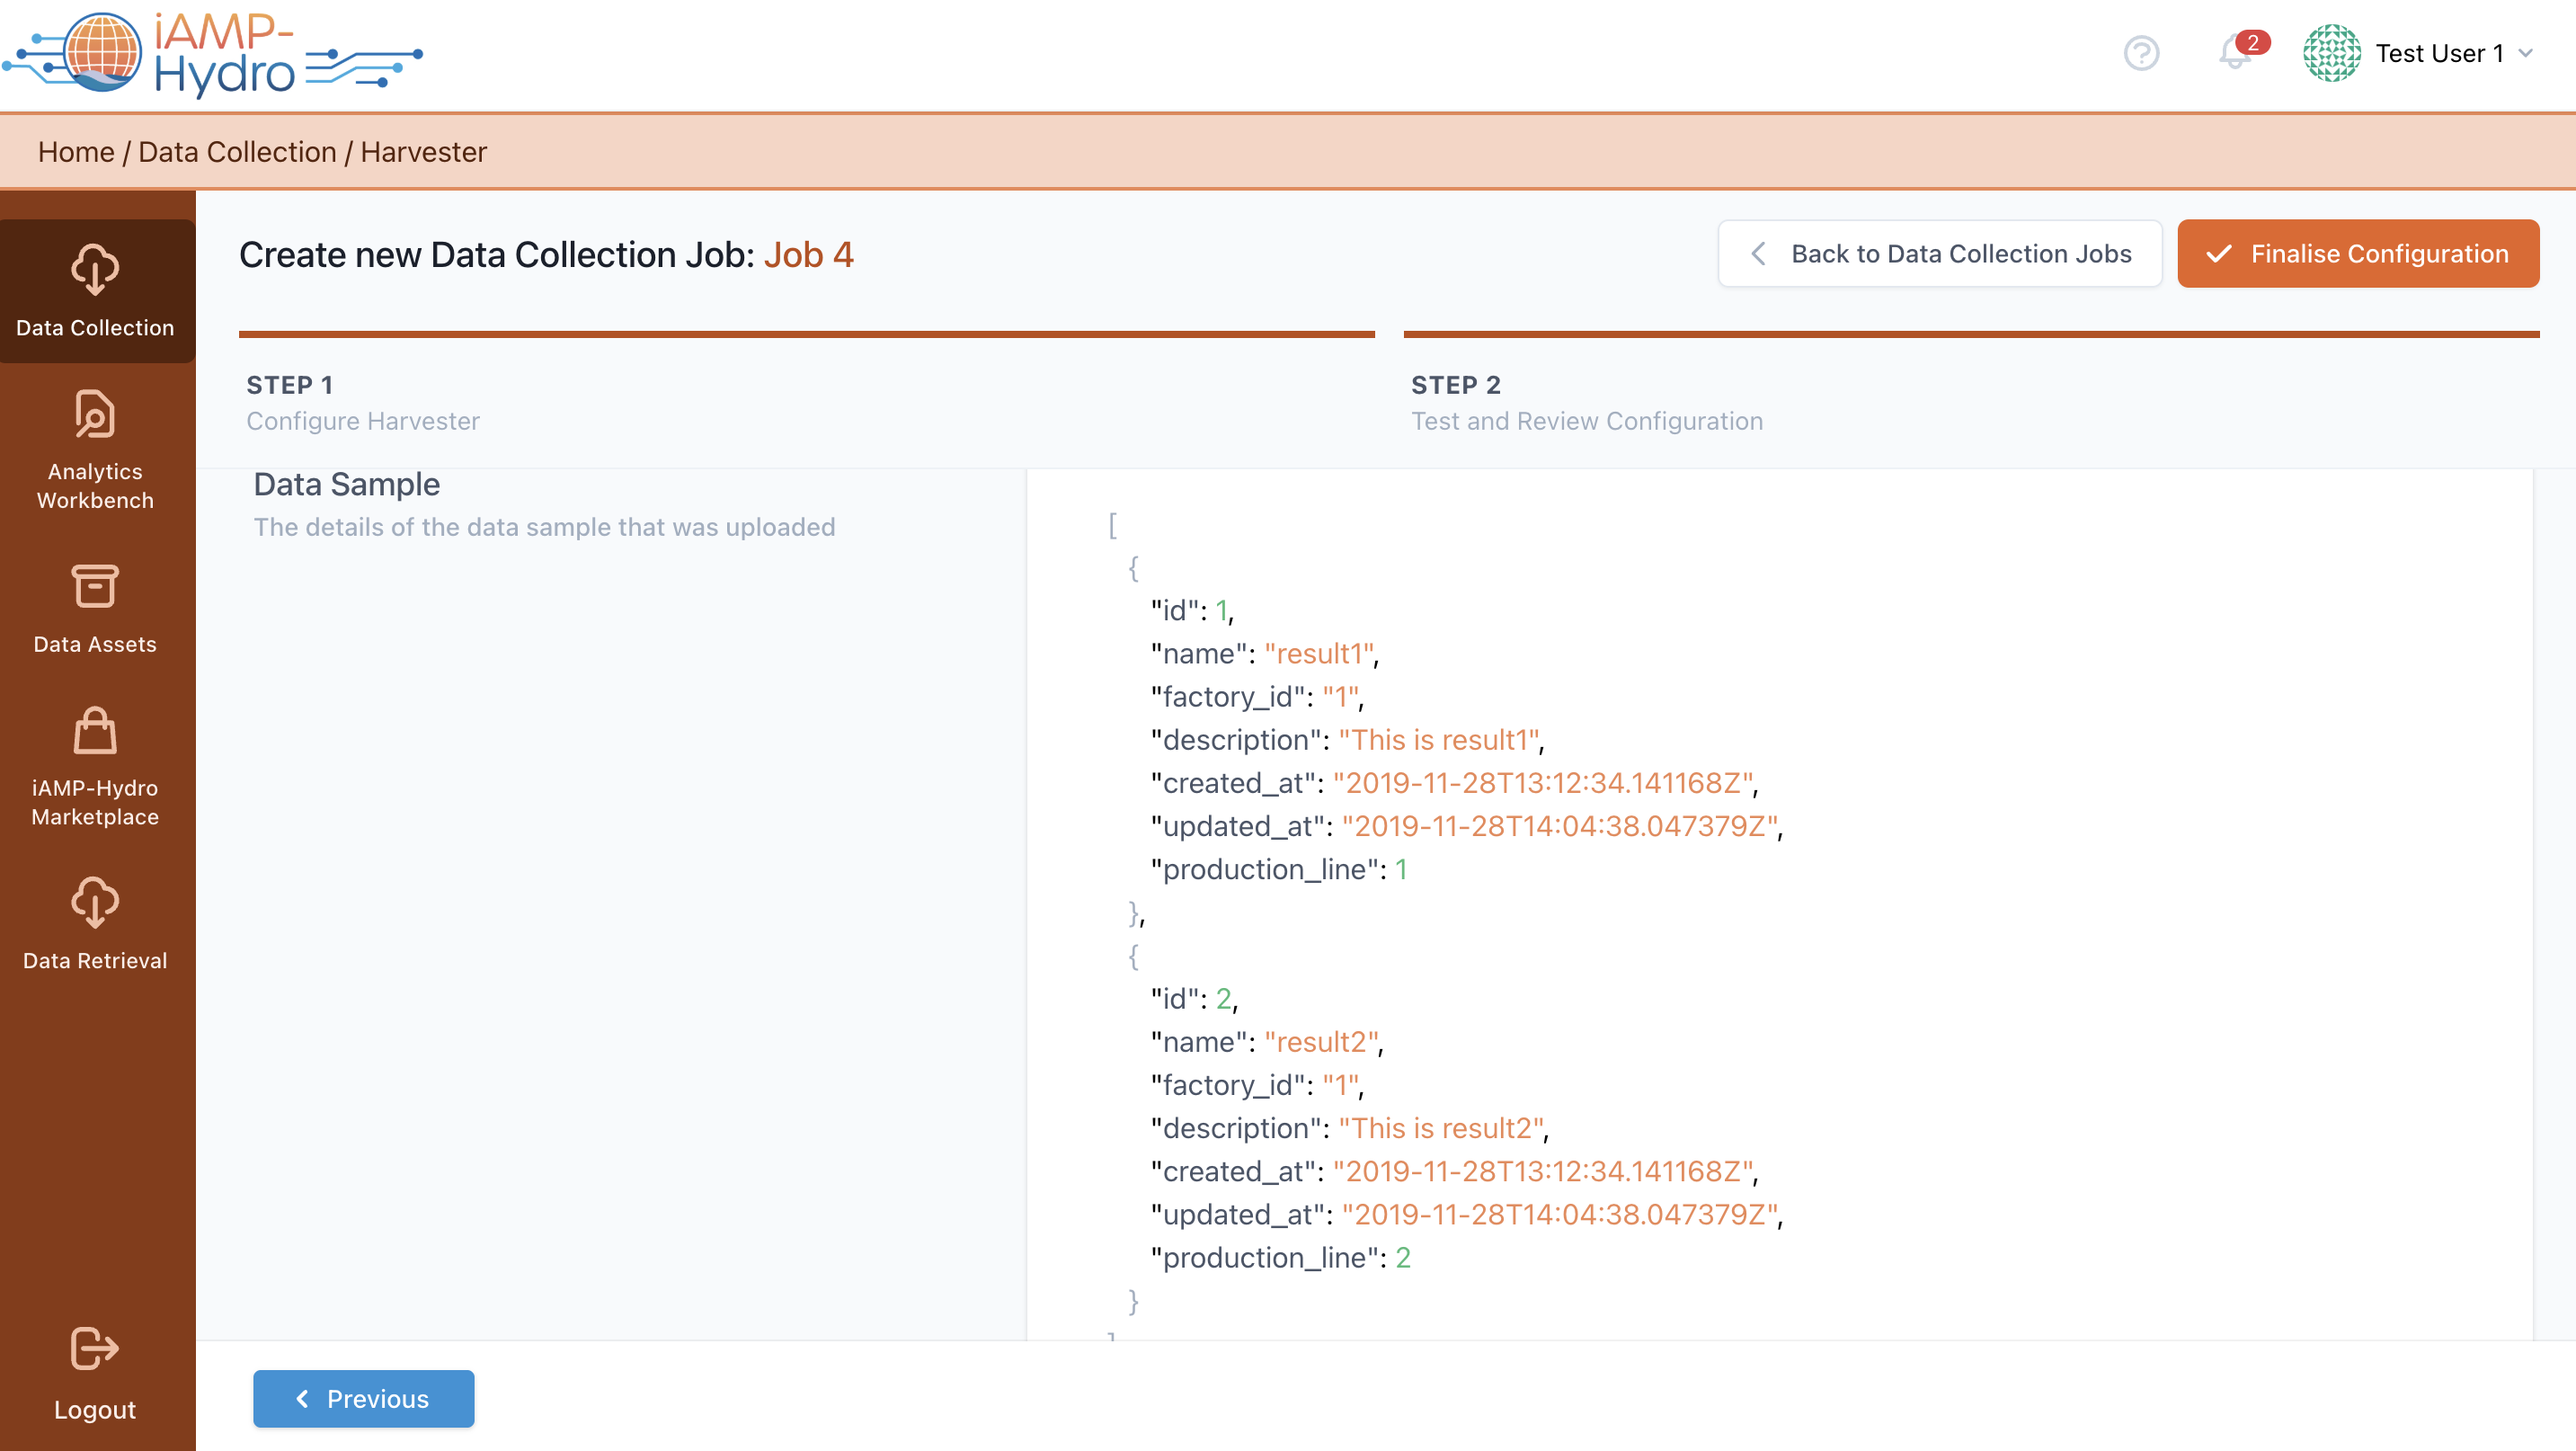
In the next page, an automatically generated API endpoint on the iAM Platform is presented to you. Though, to access this API, specific instructions need to be followed. These include employing an existing access token or creating a new one. For posting data to the platform, an access token with "upload" scope is needed, while a token with "monitor" scope is necessary to retrieve information on execution status. This token will authenticate API requests. Ultimately, users have the option to examine the configuration details and the data sample uploaded earlier, then click on Finalize to continue with the subsequent phases of the Data Collection Job configuration.
Configure the Mapping Step
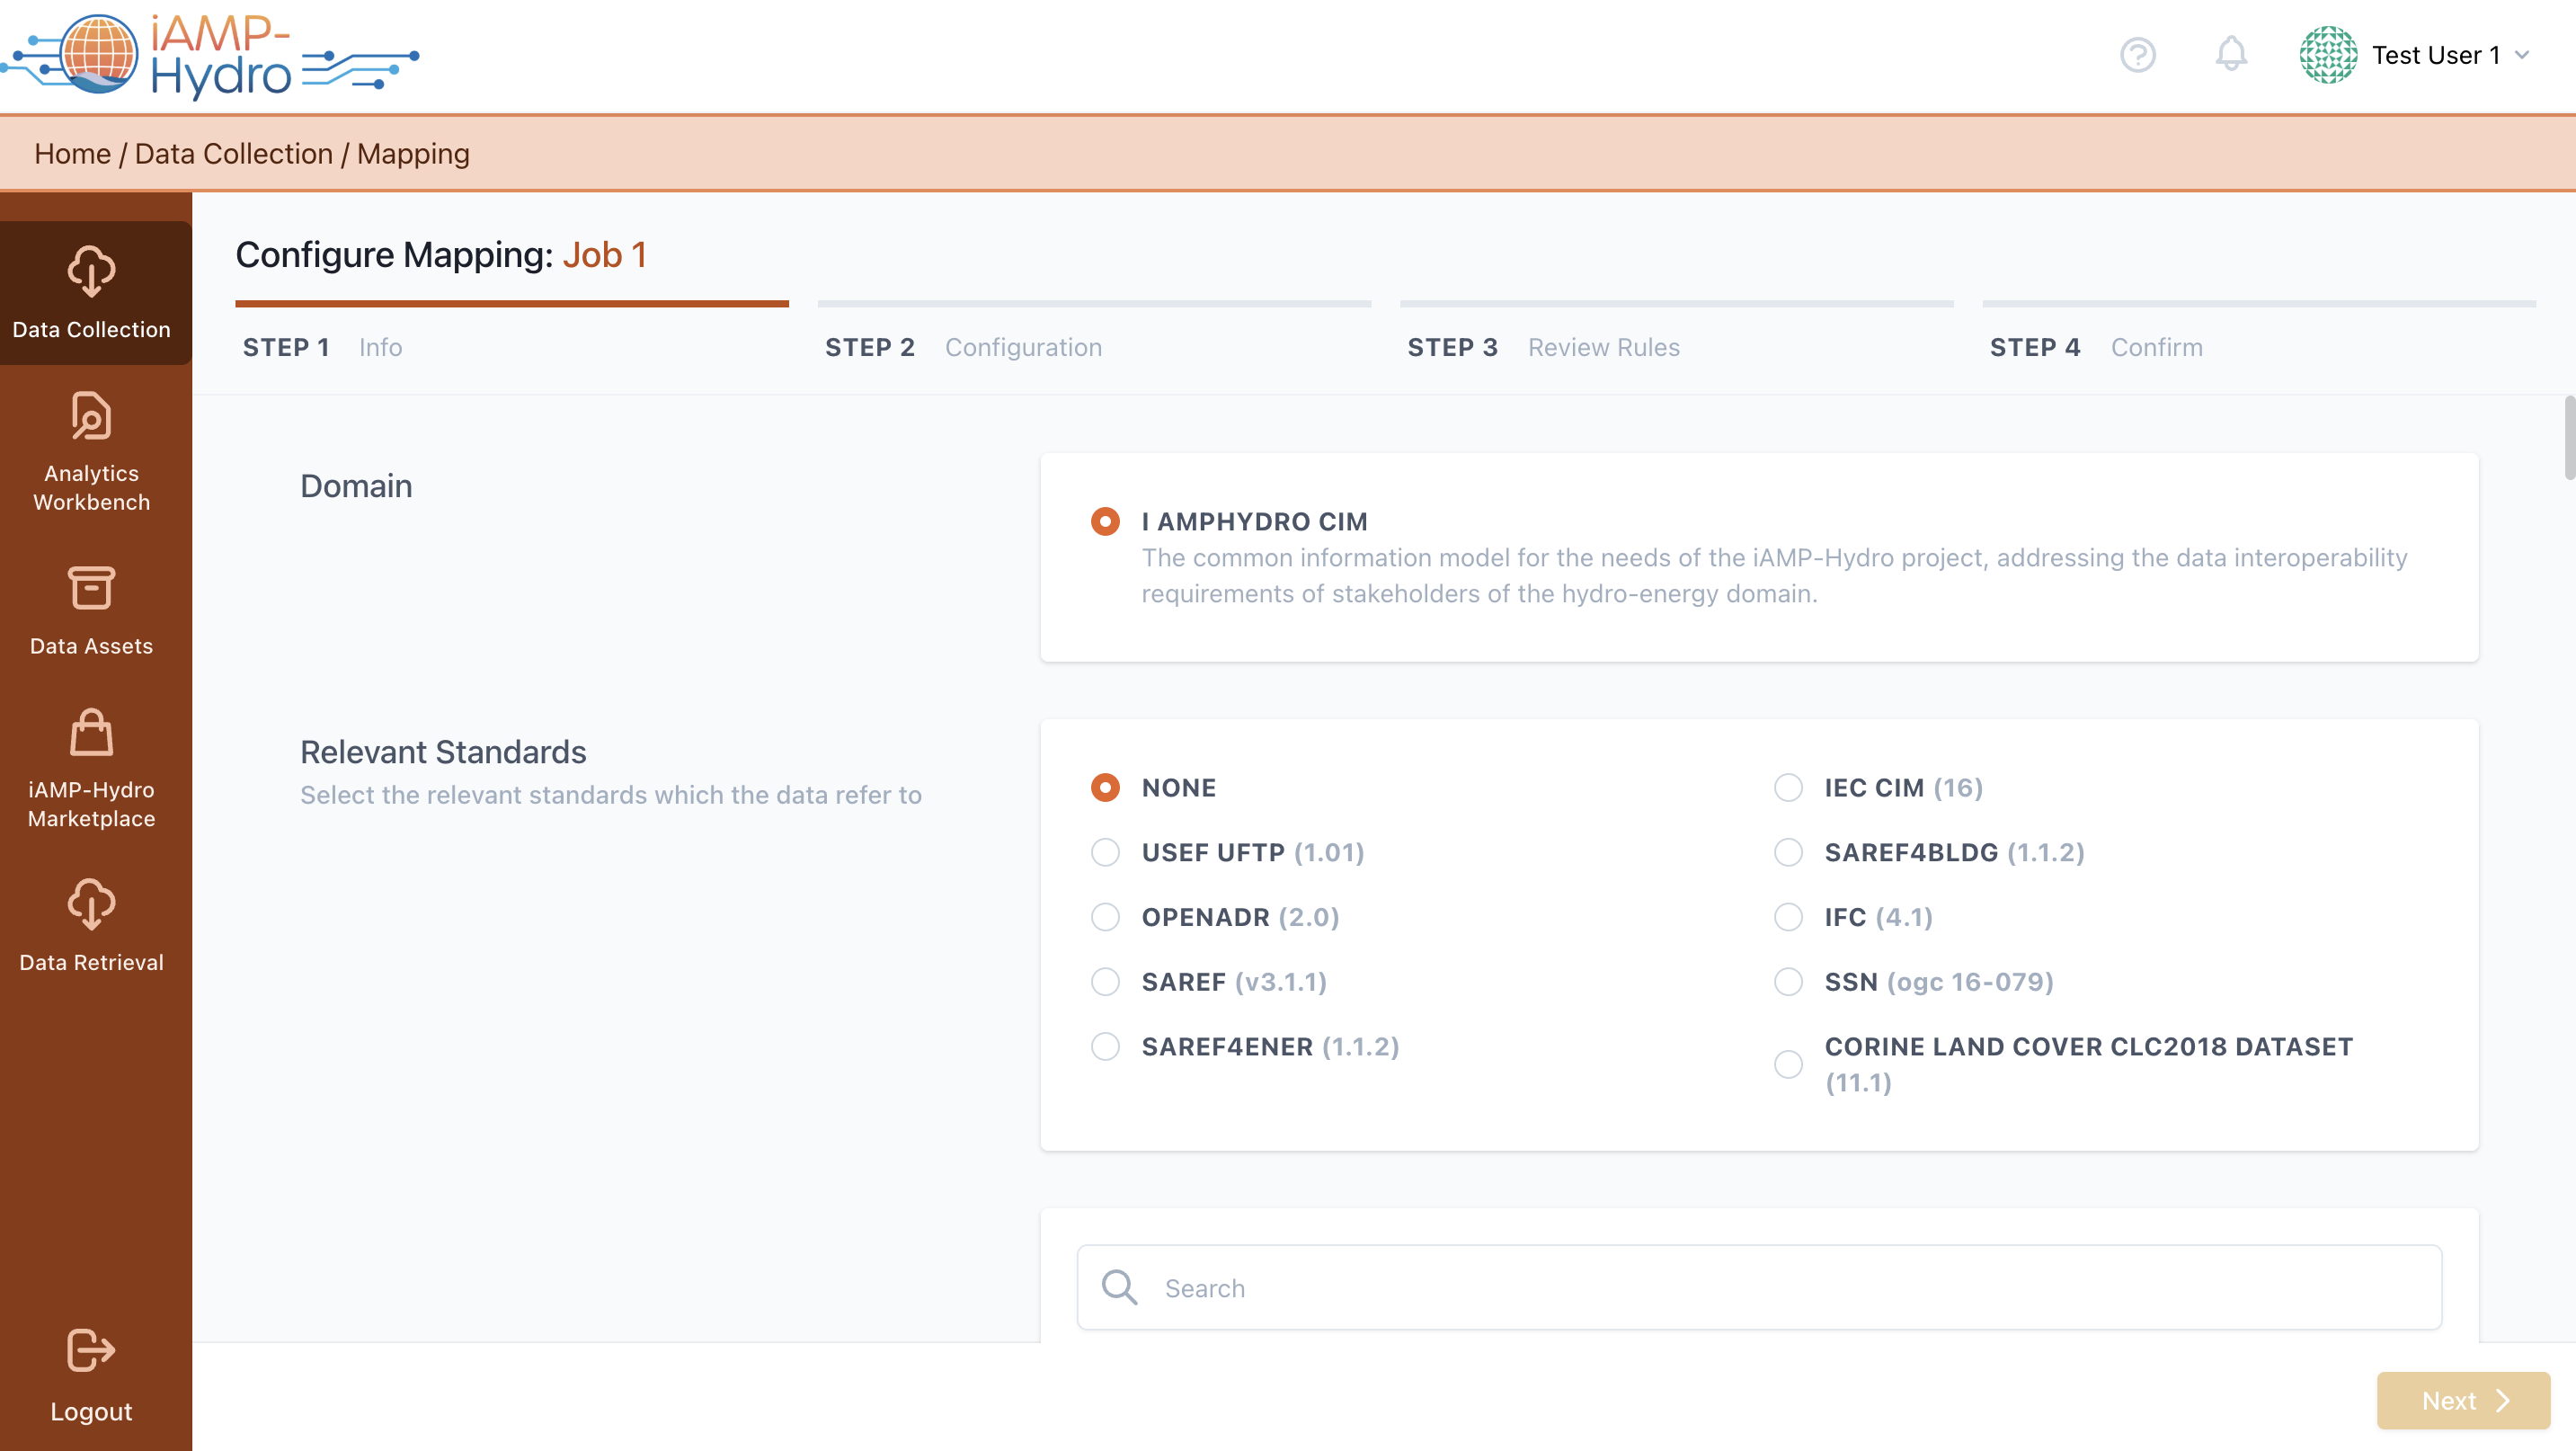
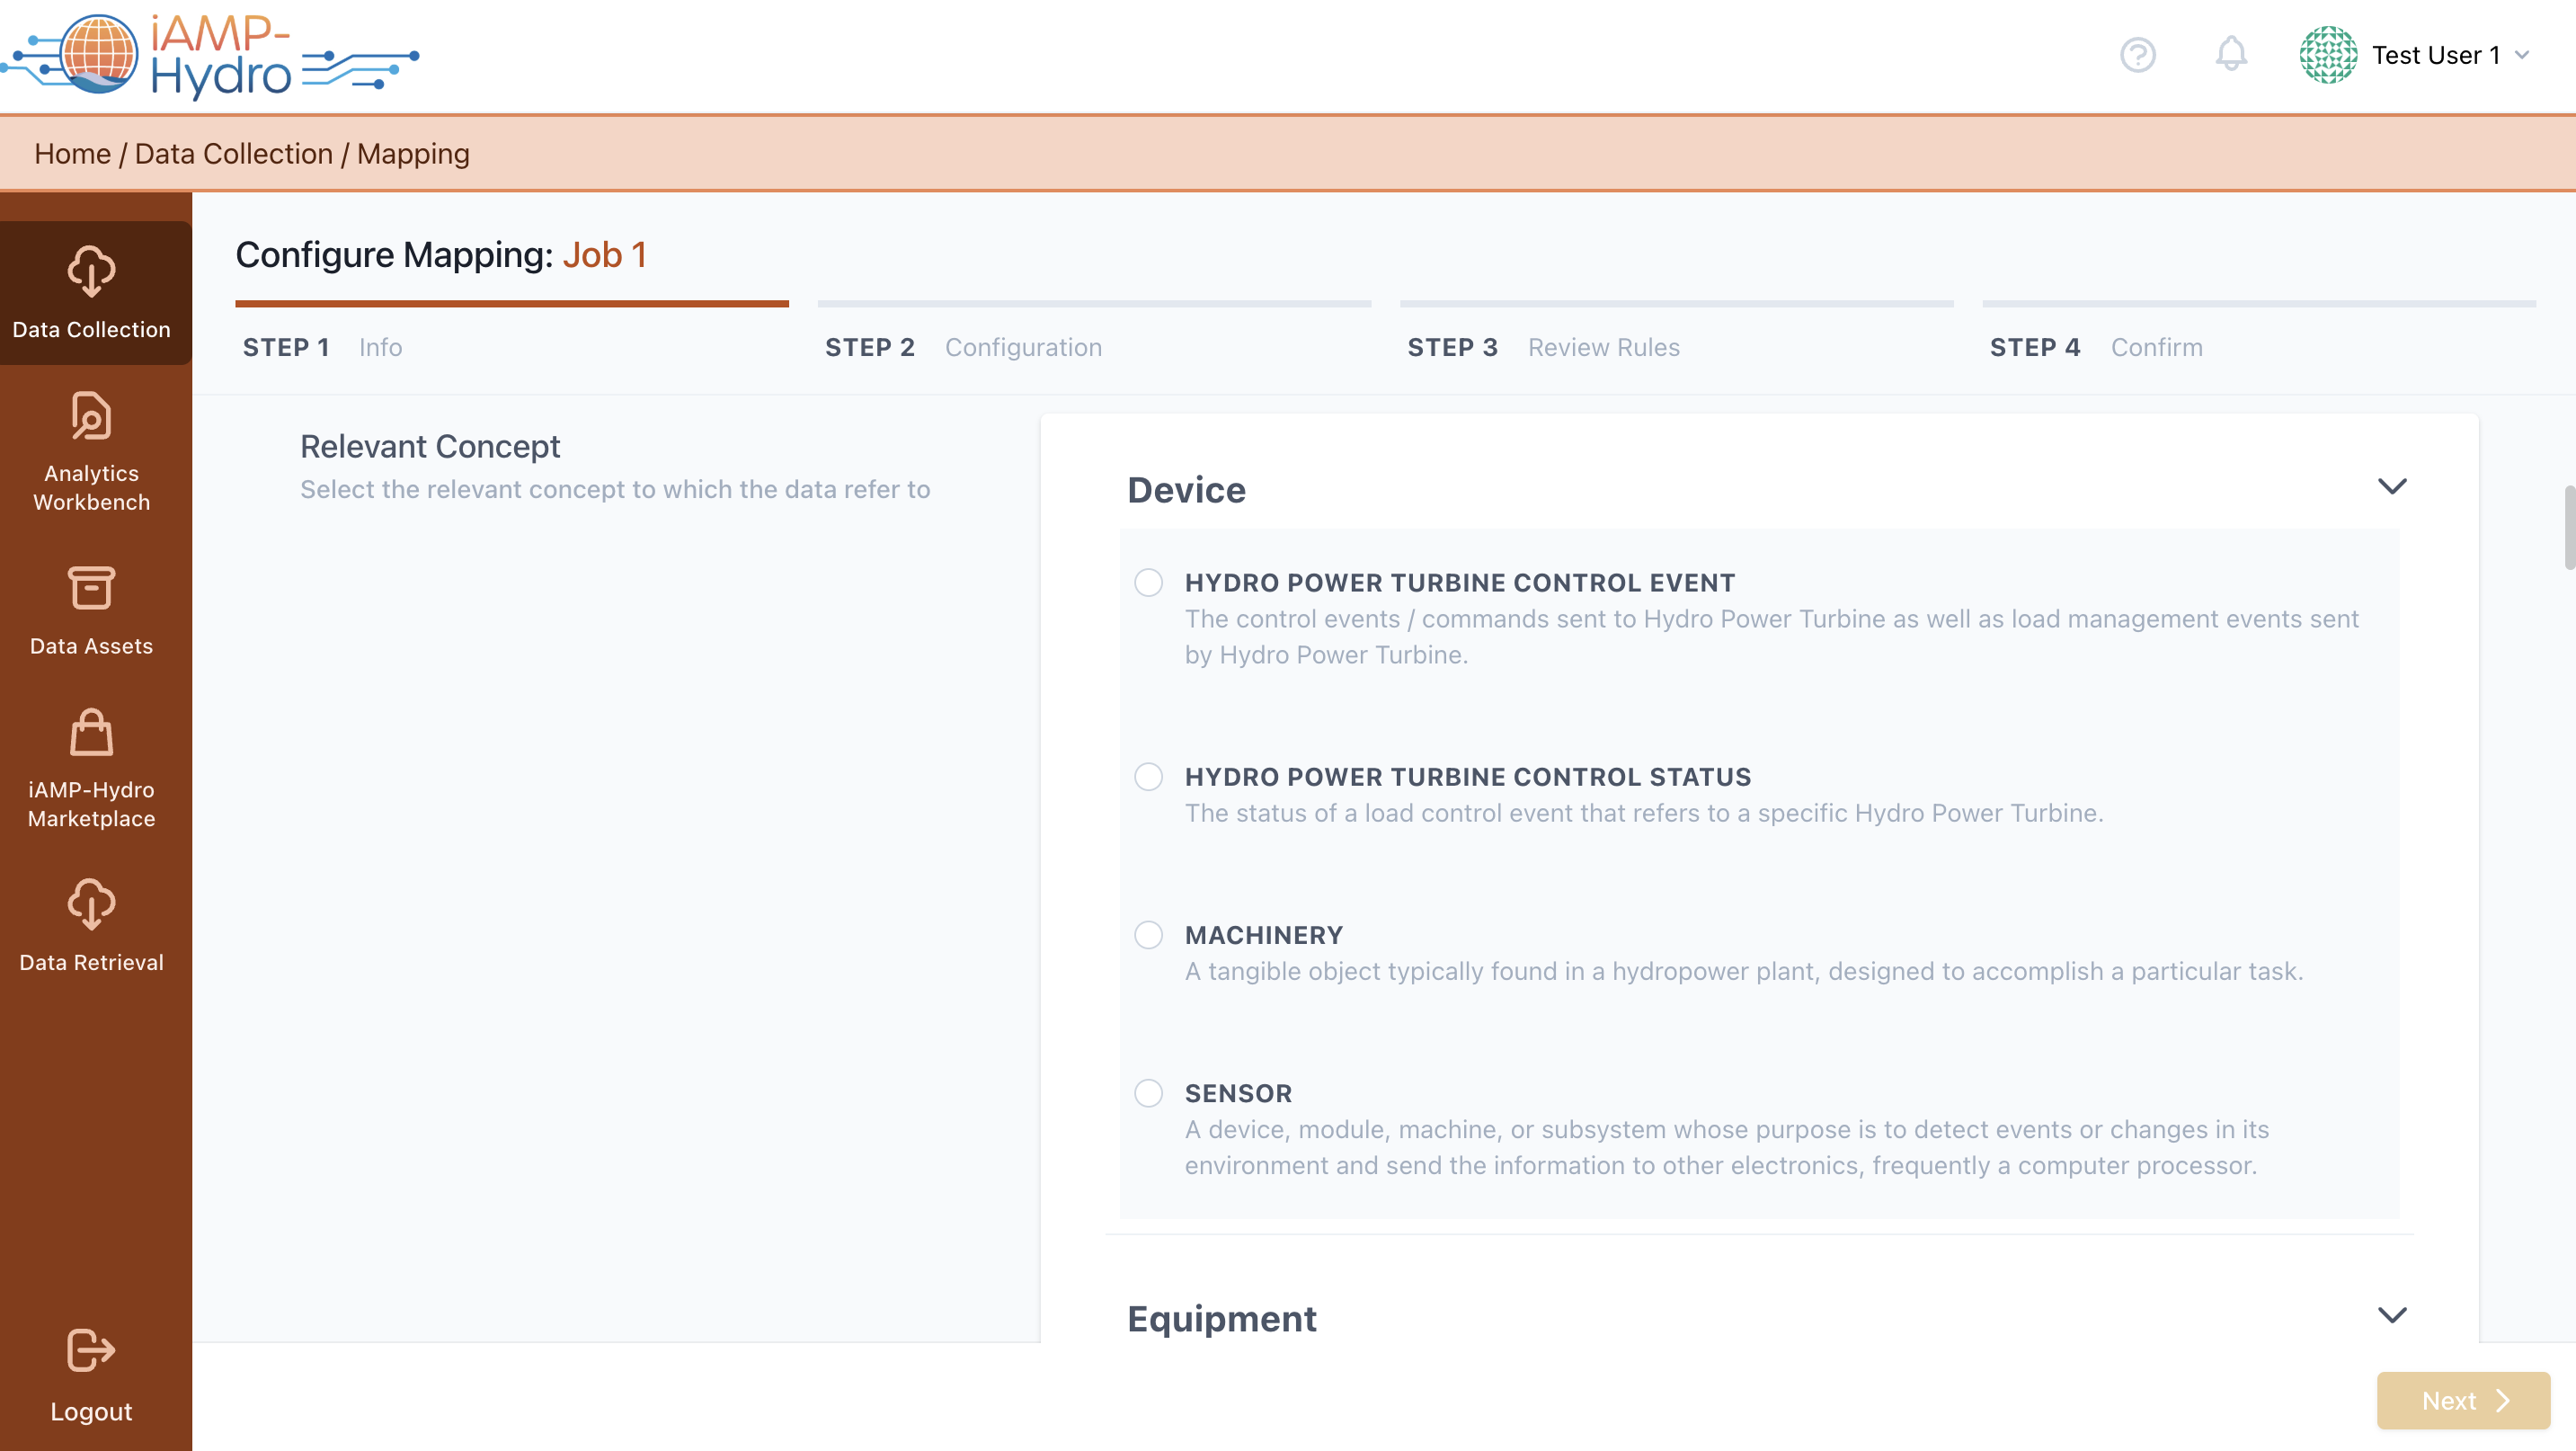
The process of defining mapping rules is structured into three key stages: Mapping Information, Mapping Configuration, and Mapping Review and Confirmation. Initially, in the Mapping Info stage, you're prompted to choose the relevant standard that the data to be ingested adheres to, if any, and to identify the primary category relevant to the data, as shown in the accompanying figure. Following the selection of a category, it's necessary to pinpoint the most fitting concept that encapsulates the essence of the data set to be uploaded and choose if the original source field names or an alias should be preserved.
Hint
The platform offers predictions along with confidence levels indicating to what extent the prediction provided is considered to be correct. If a mapping is not predicted or it appears incorrect, you can manually search for the appropriate field/concept within the Data Model section on the left, as indicated in another figure, where a brief description of the selected item is also provided.
Hint
Thoroughly review all mappings, regardless of confidence level.
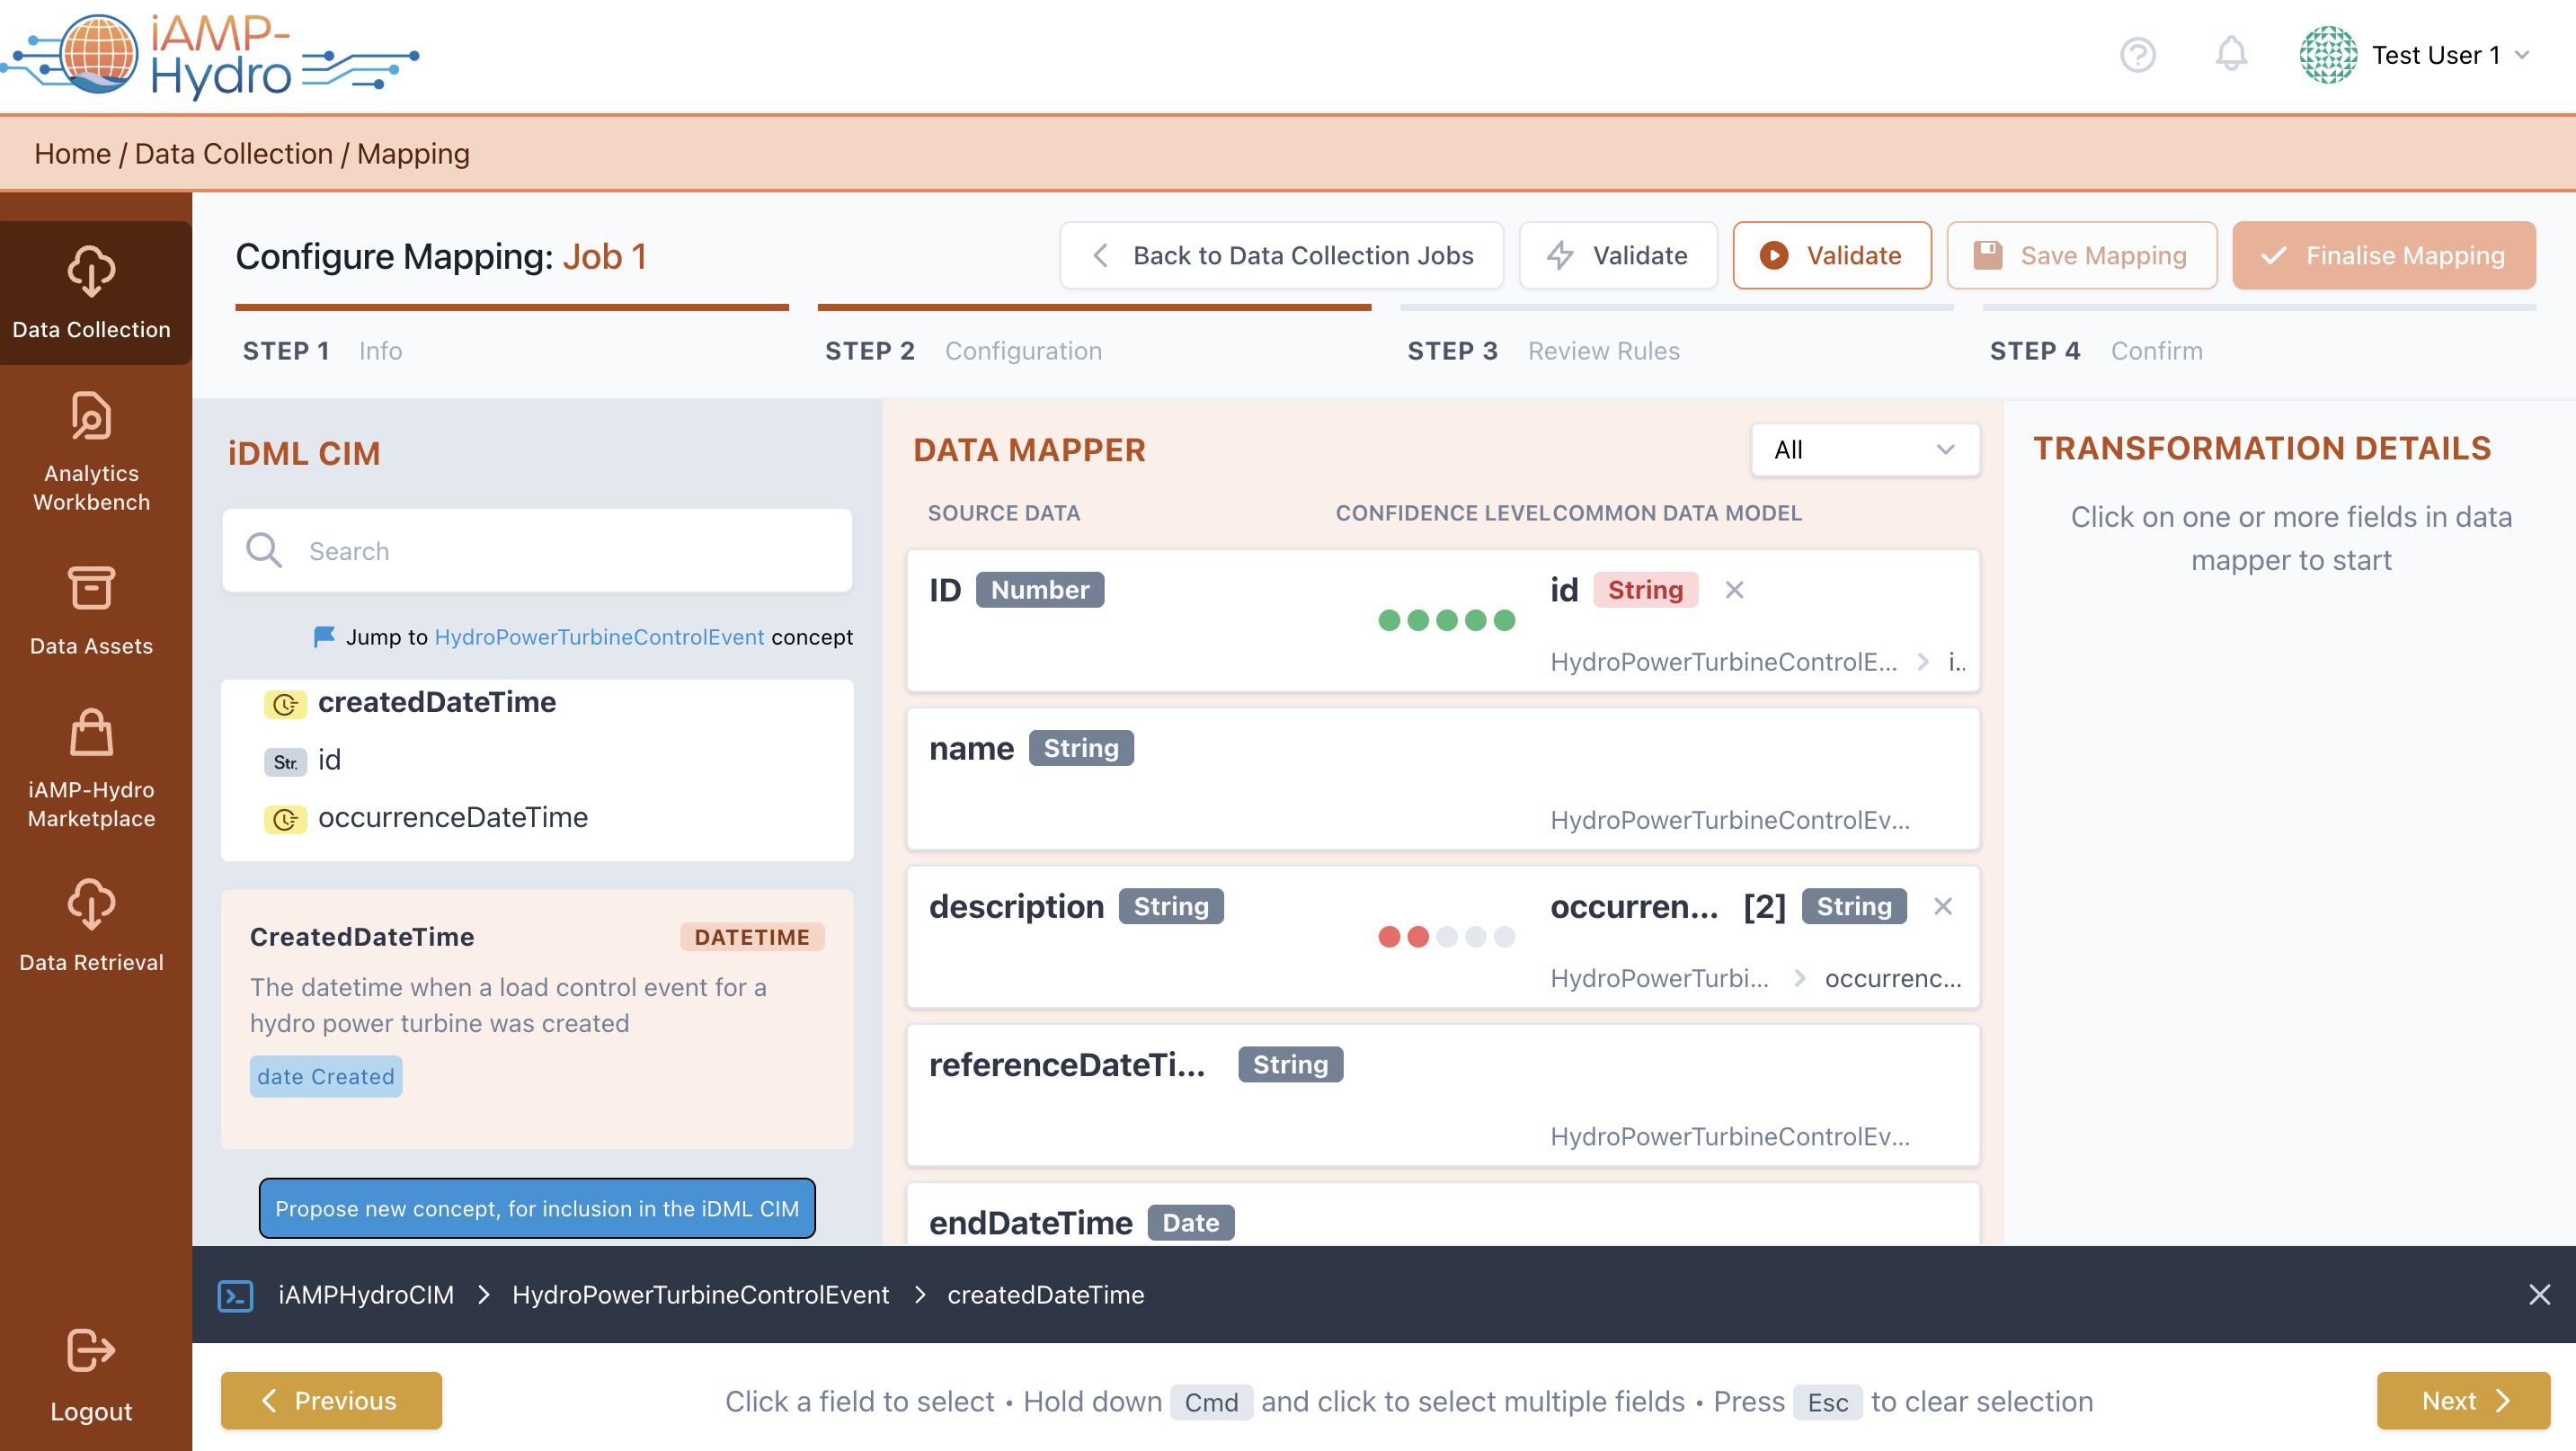
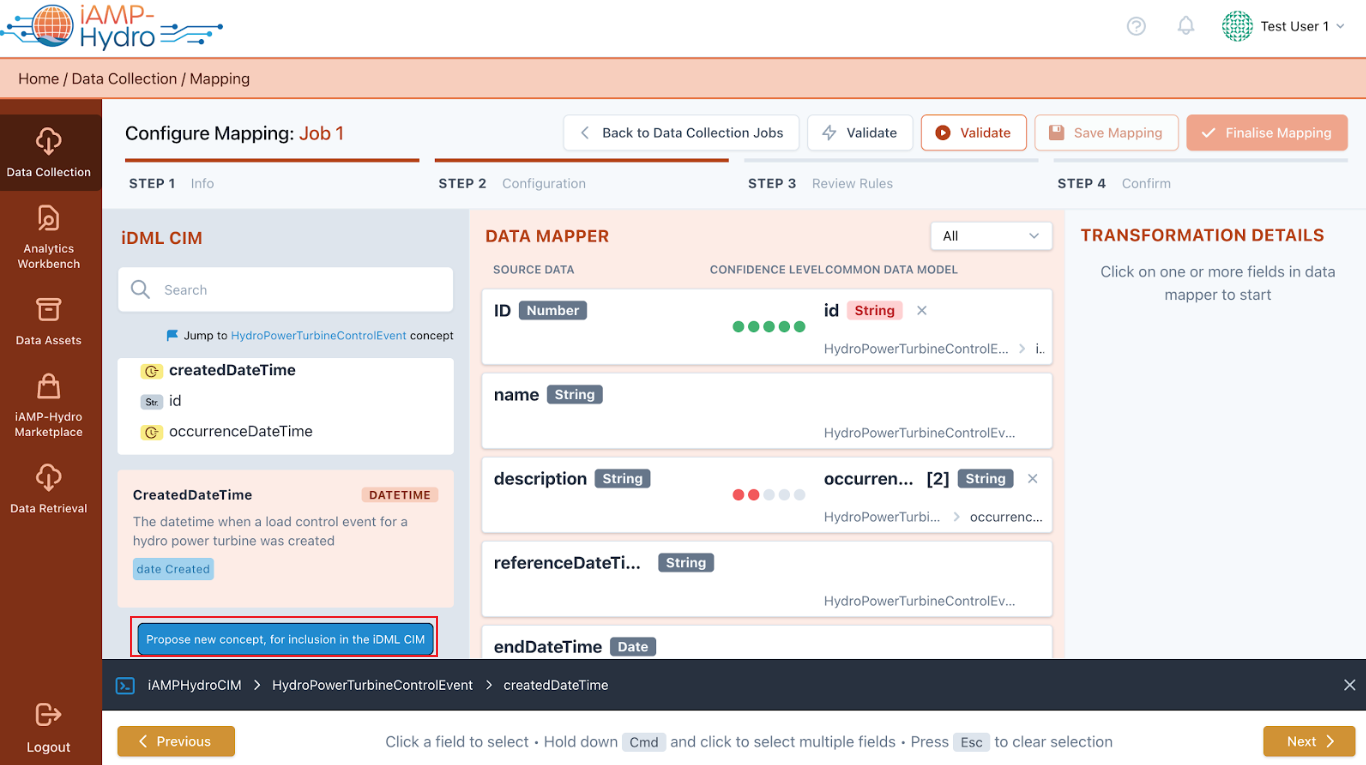
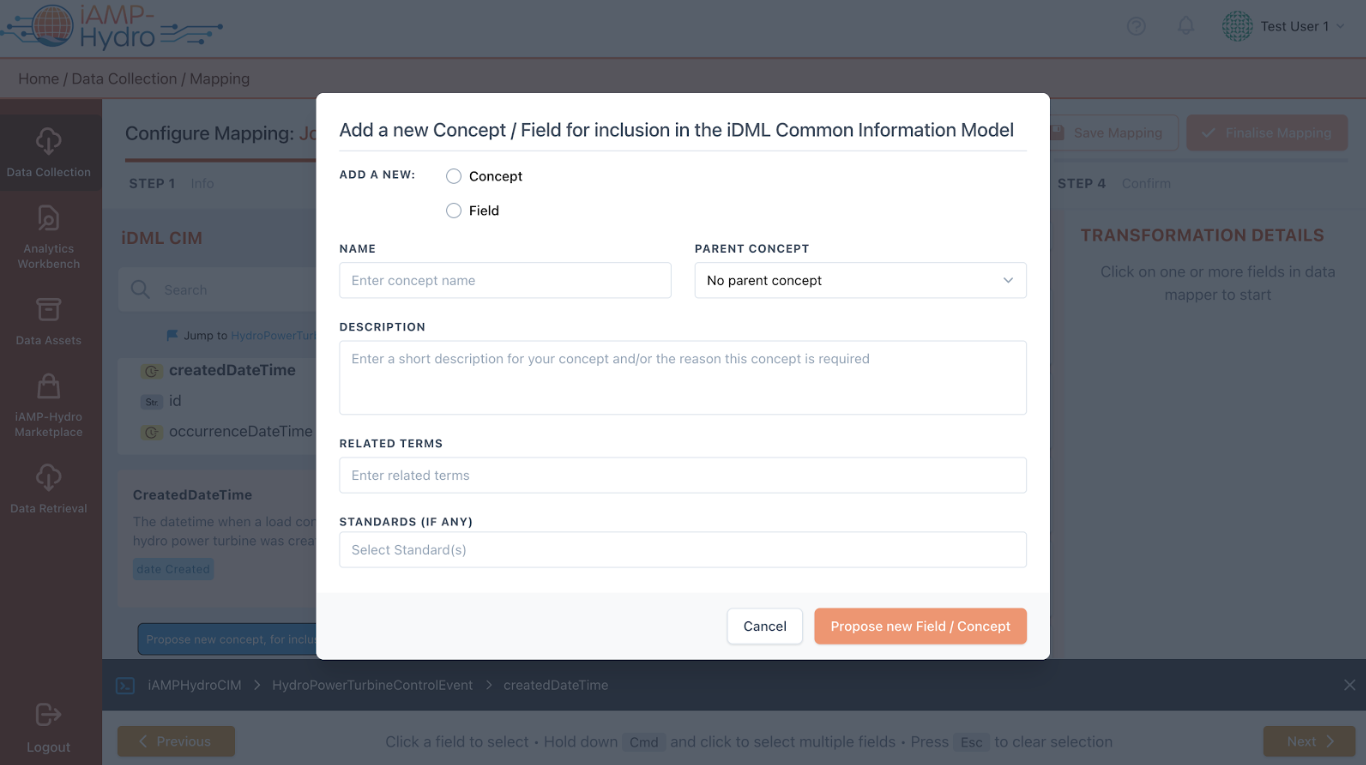
Moreover, if the iAMP Hydro Common Information Model (CIM) does not already include a necessary field/concept, you have the option to suggest a new one via the “Let us know” link, opening a window for proposing its addition to the common data model.
Each source data field can be associated with a specific field or concept listed in the Data Model section. Mapping a source data field to a specific field involves dragging the desired field to the corresponding row in the Mapping Playground. Furthermore, associating a source data field with fields of a related concept is done by selecting the desired row in the Mapping Playground and choosing the relevant concept (along with a related prefix) from a dropdown menu in the Mapping Details section on the right. When the associated concept allows for customization as per the Data Model guidelines, you have the option to specify a unique prefix and its definition.
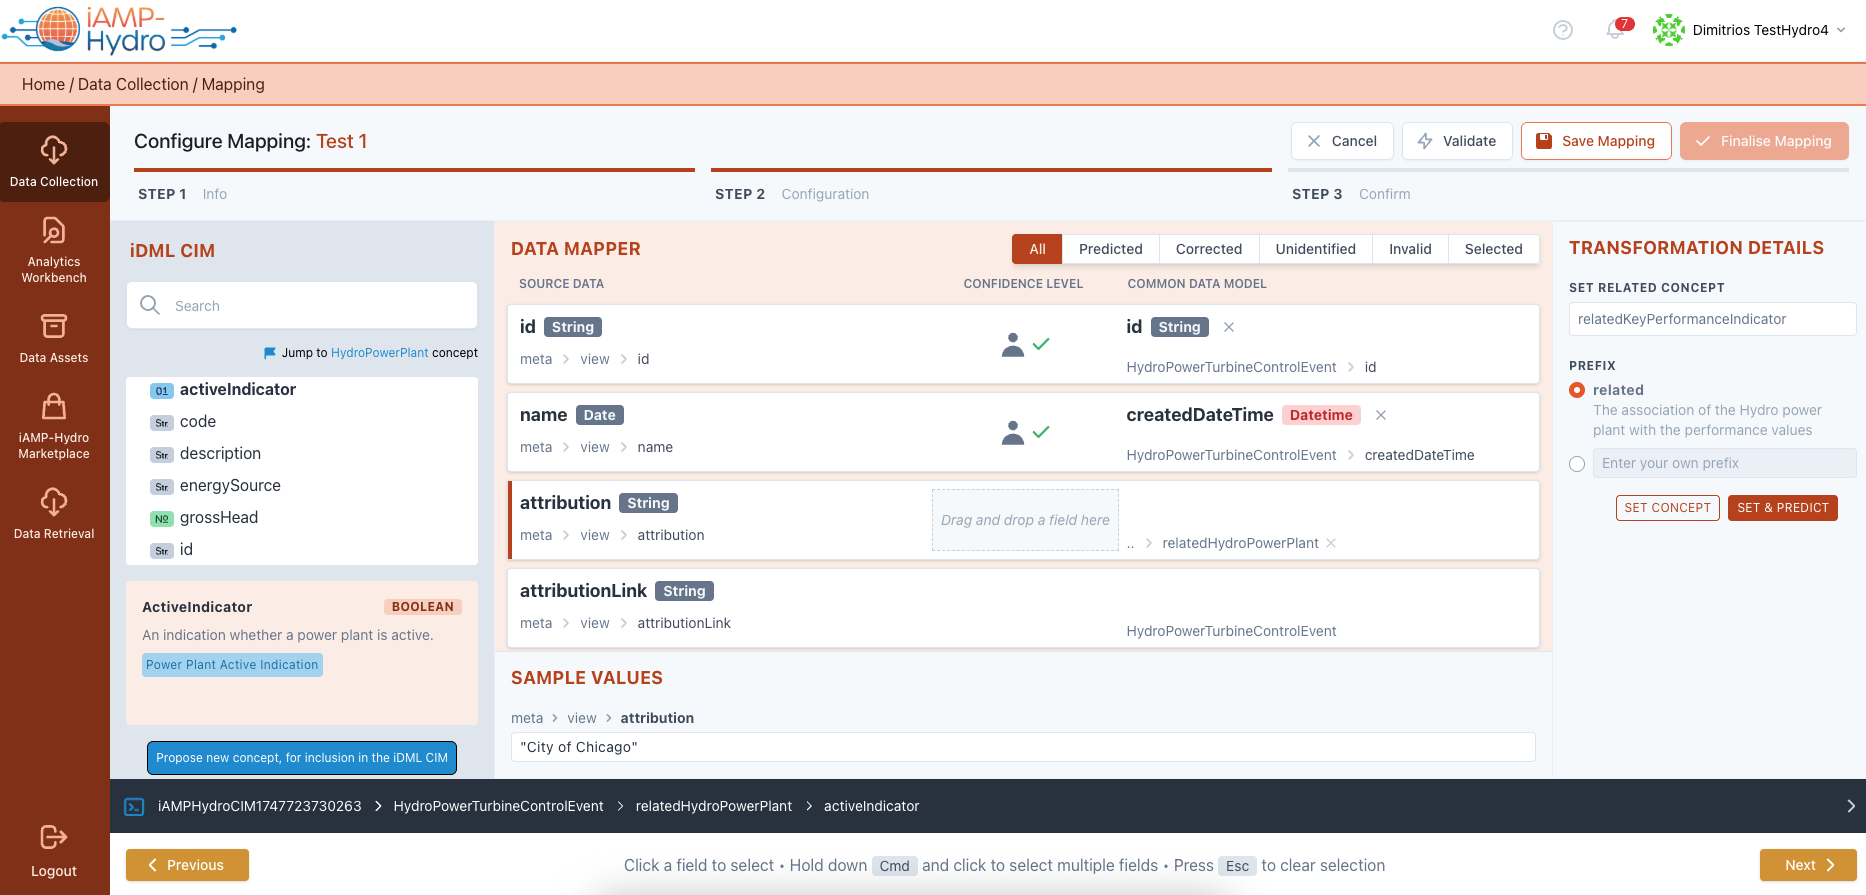
After selecting "Set Concept," a list of all fields within the chosen concept is displayed, allowing you to map your input data to a specific field within the selected concept. This process links fields in your source data with fields in the selected concept, enhancing the data's alignment with the iAMP Hydro CIM. Selecting "Set Concept & Predict" re-runs the prediction mechanism to suggest mappings between your data and the chosen related concept. The right section displays Transformation Details, including transformation rules based on data type and Data Model requirements. For datetime fields, you specify the desired format and time zone.
Hint
The iAM Platform ensures your data is mapped and transformed to the standard measurement unit (e.g., converting seconds to hours as per IAMP Hydro CIM standards using the appropriate formula). Additionally, data type casting as per Data Model guidelines is performed (e.g., from integer to double, string to datetime, etc.).
In the Mapping Playground, you can filter concept views by categories like Predicted Mappings and Unidentified Mappings. If you wish to proceed with uploading data while awaiting the approval of a proposed new concept, you can do so with the already mapped data. Should the new concept be approved, you can then update your data asset.
Hint
At any moment, tou can click on the “Validate” button to ensure that the mapping configuration you performed is valid.
Upon finalizing the mapping configuration by clicking "Next” or opting to “Run on Sample”, you may view how the mapping rules you have configured so far are applied to your data and you get notified in case of problems/errors. You are also able to compare the original sample with the processed sample to view the differences.

Finally, the Mapping Confirm page is loaded, summarising the mapped concepts to the iAMP Hydro CIM and their transformation settings. You can delve into mapping and transformation details for each field by selecting a row, and at the page's bottom, Unidentified Concepts are listed, indicating items not mapped to the data model and excluded from the upload to the iAM Platform for further processing.

Configure the Cleaning Step
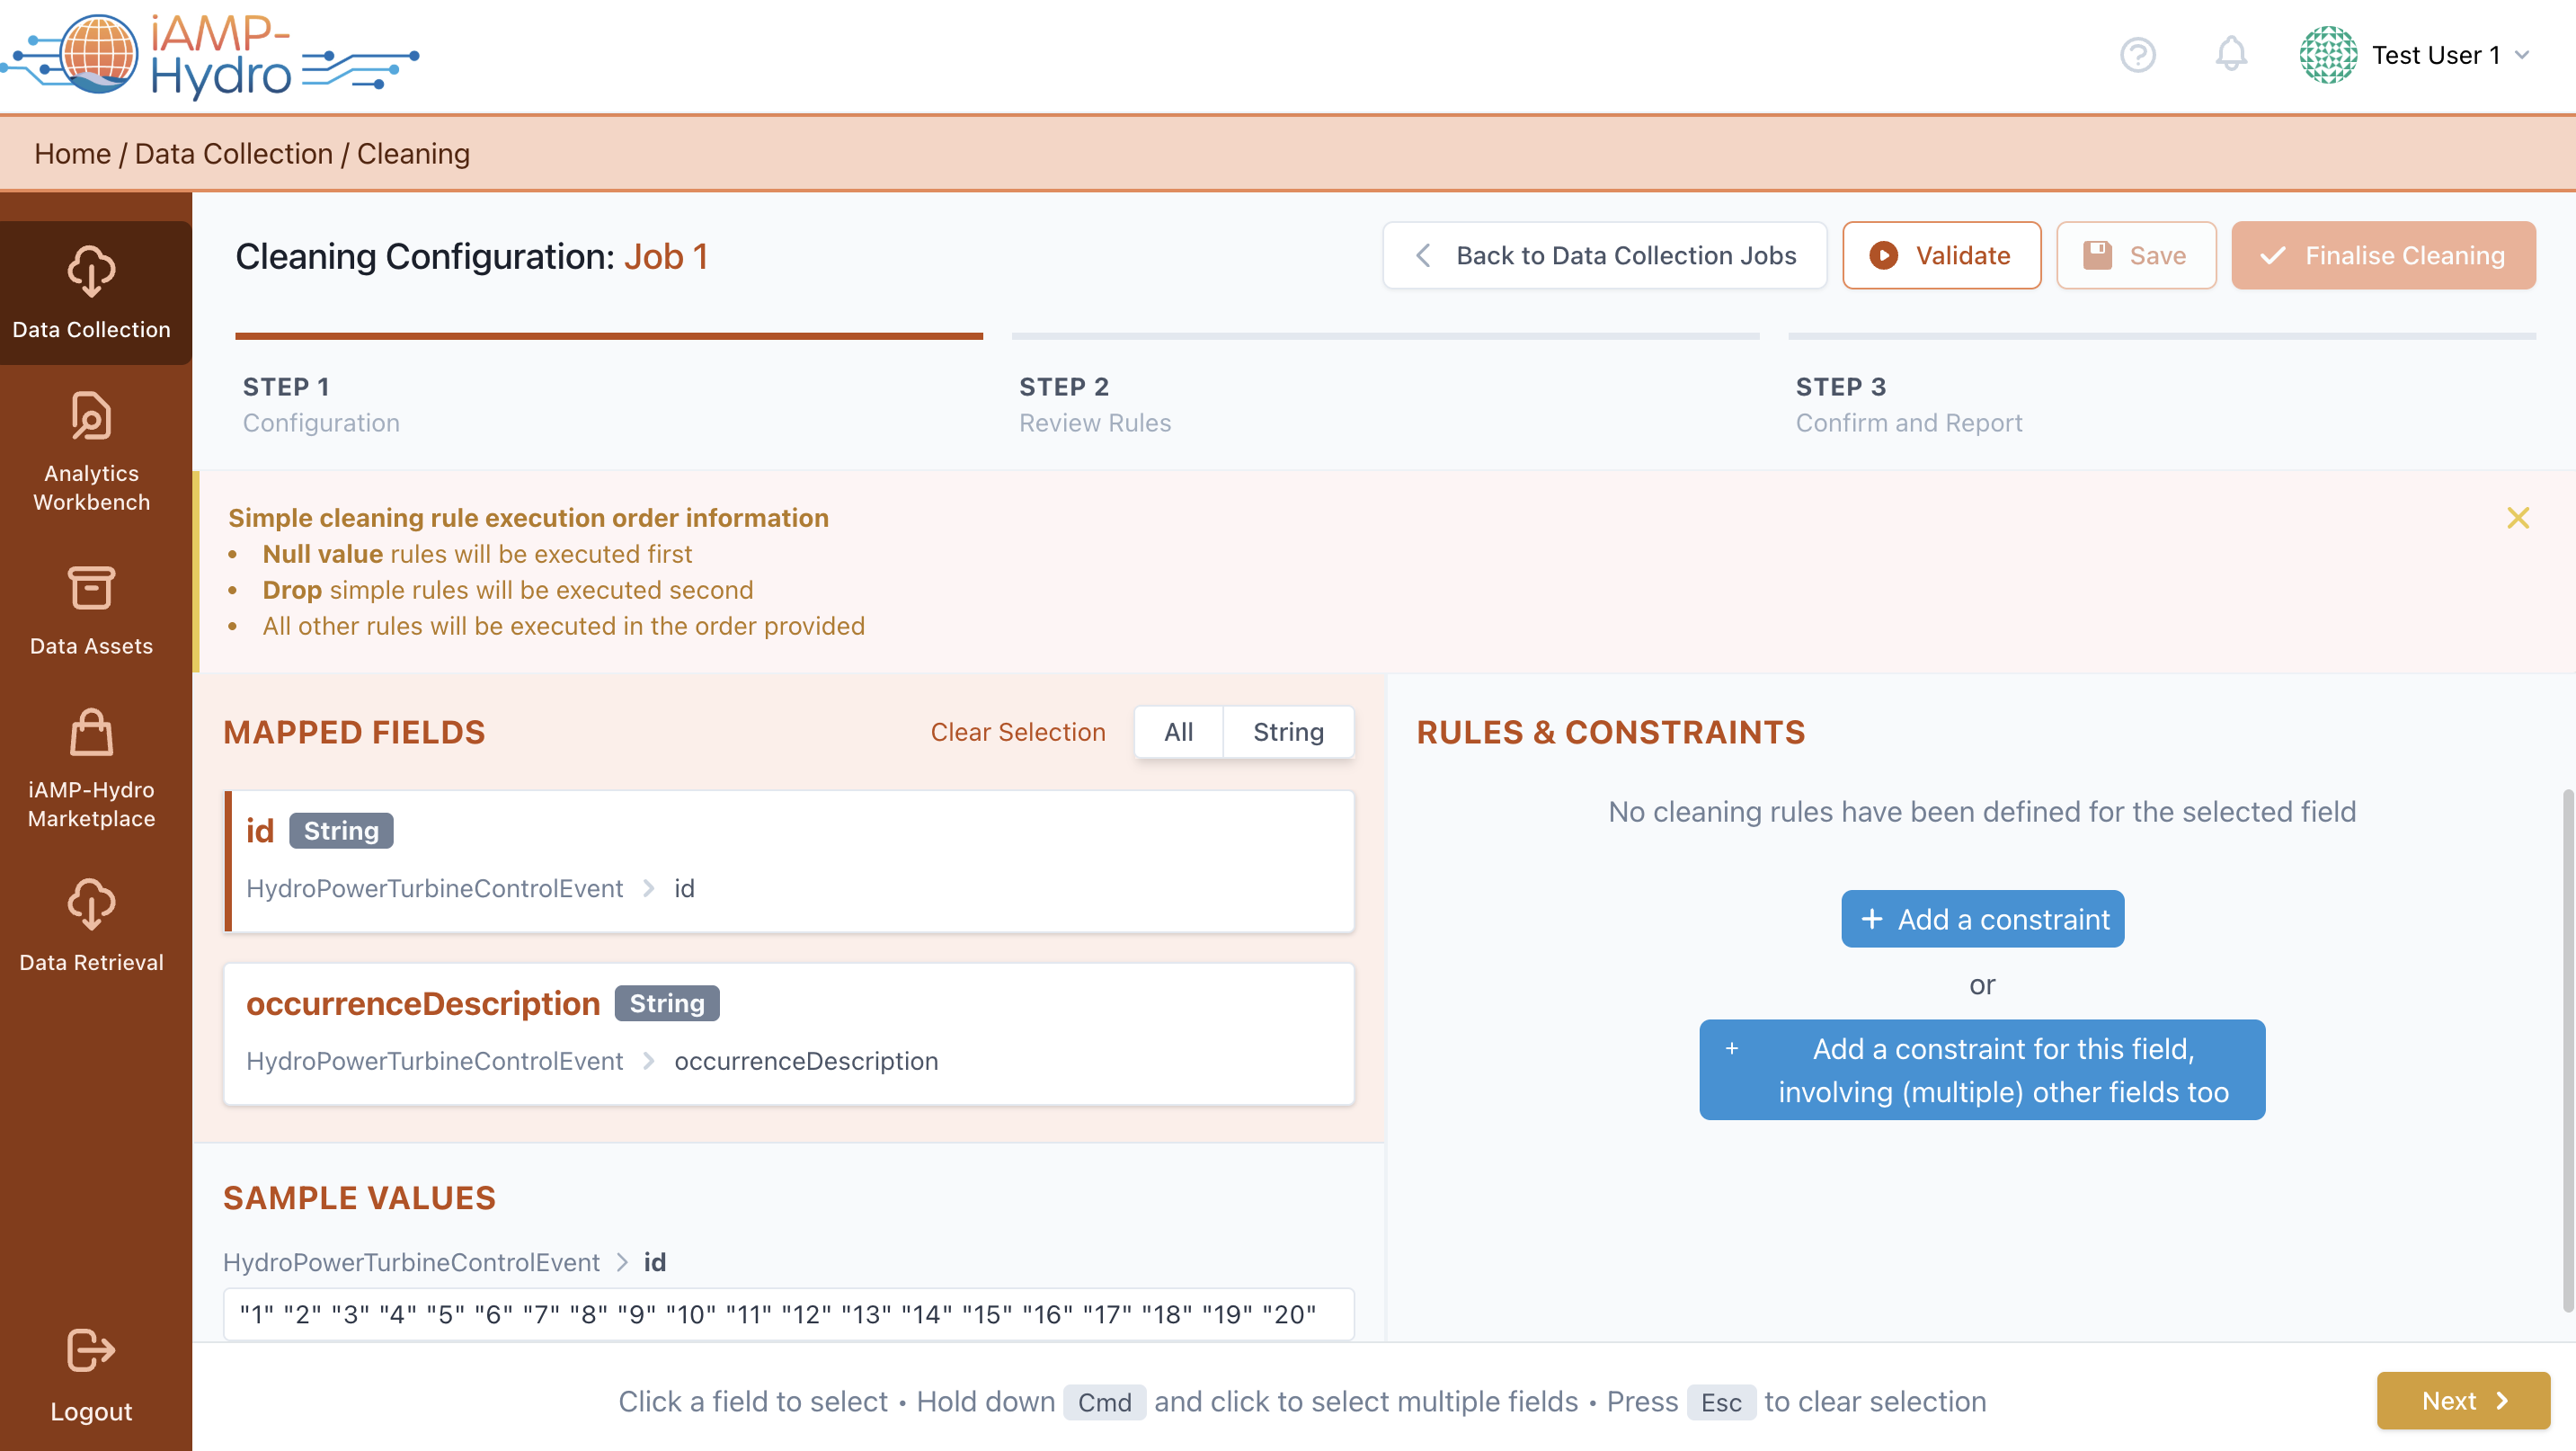
In case you have opted for the cleaning step in your Data Collection Job, you need to define the cleaning rules that are to be applied in your data in order to handle any missing values, duplicates or outliers. In general, the cleaning rules include various validation options and correction measures. Validation involves specifying permissible value ranges, ensuring uniqueness, mandating data presence, defining regular expression patterns for validation, and identifying outliers. Correction, on the other hand, includes eliminating unnecessary entries and substituting values when required.
For each field, you may opt to define a simple cleaning rule (applicable only to the specific field) or a complex cleaning rule (that is applied to a combination of fields) as depicted in the following figure.
Hint
It's possible to choose several fields of the same data type to apply a single set of rules across multiple fields.
You may select which values for a specific field you want to clean (i.e., Nulls, Duplicates, Within a certain range (either including or excluding the thresholds set) or Outside a certain Range). You can also select to clean values that are satisfying conditions between different fields, may appear in other fields, or do not appear at all in other fields. Note: the available options may differ depending on the datatype of the selected field.
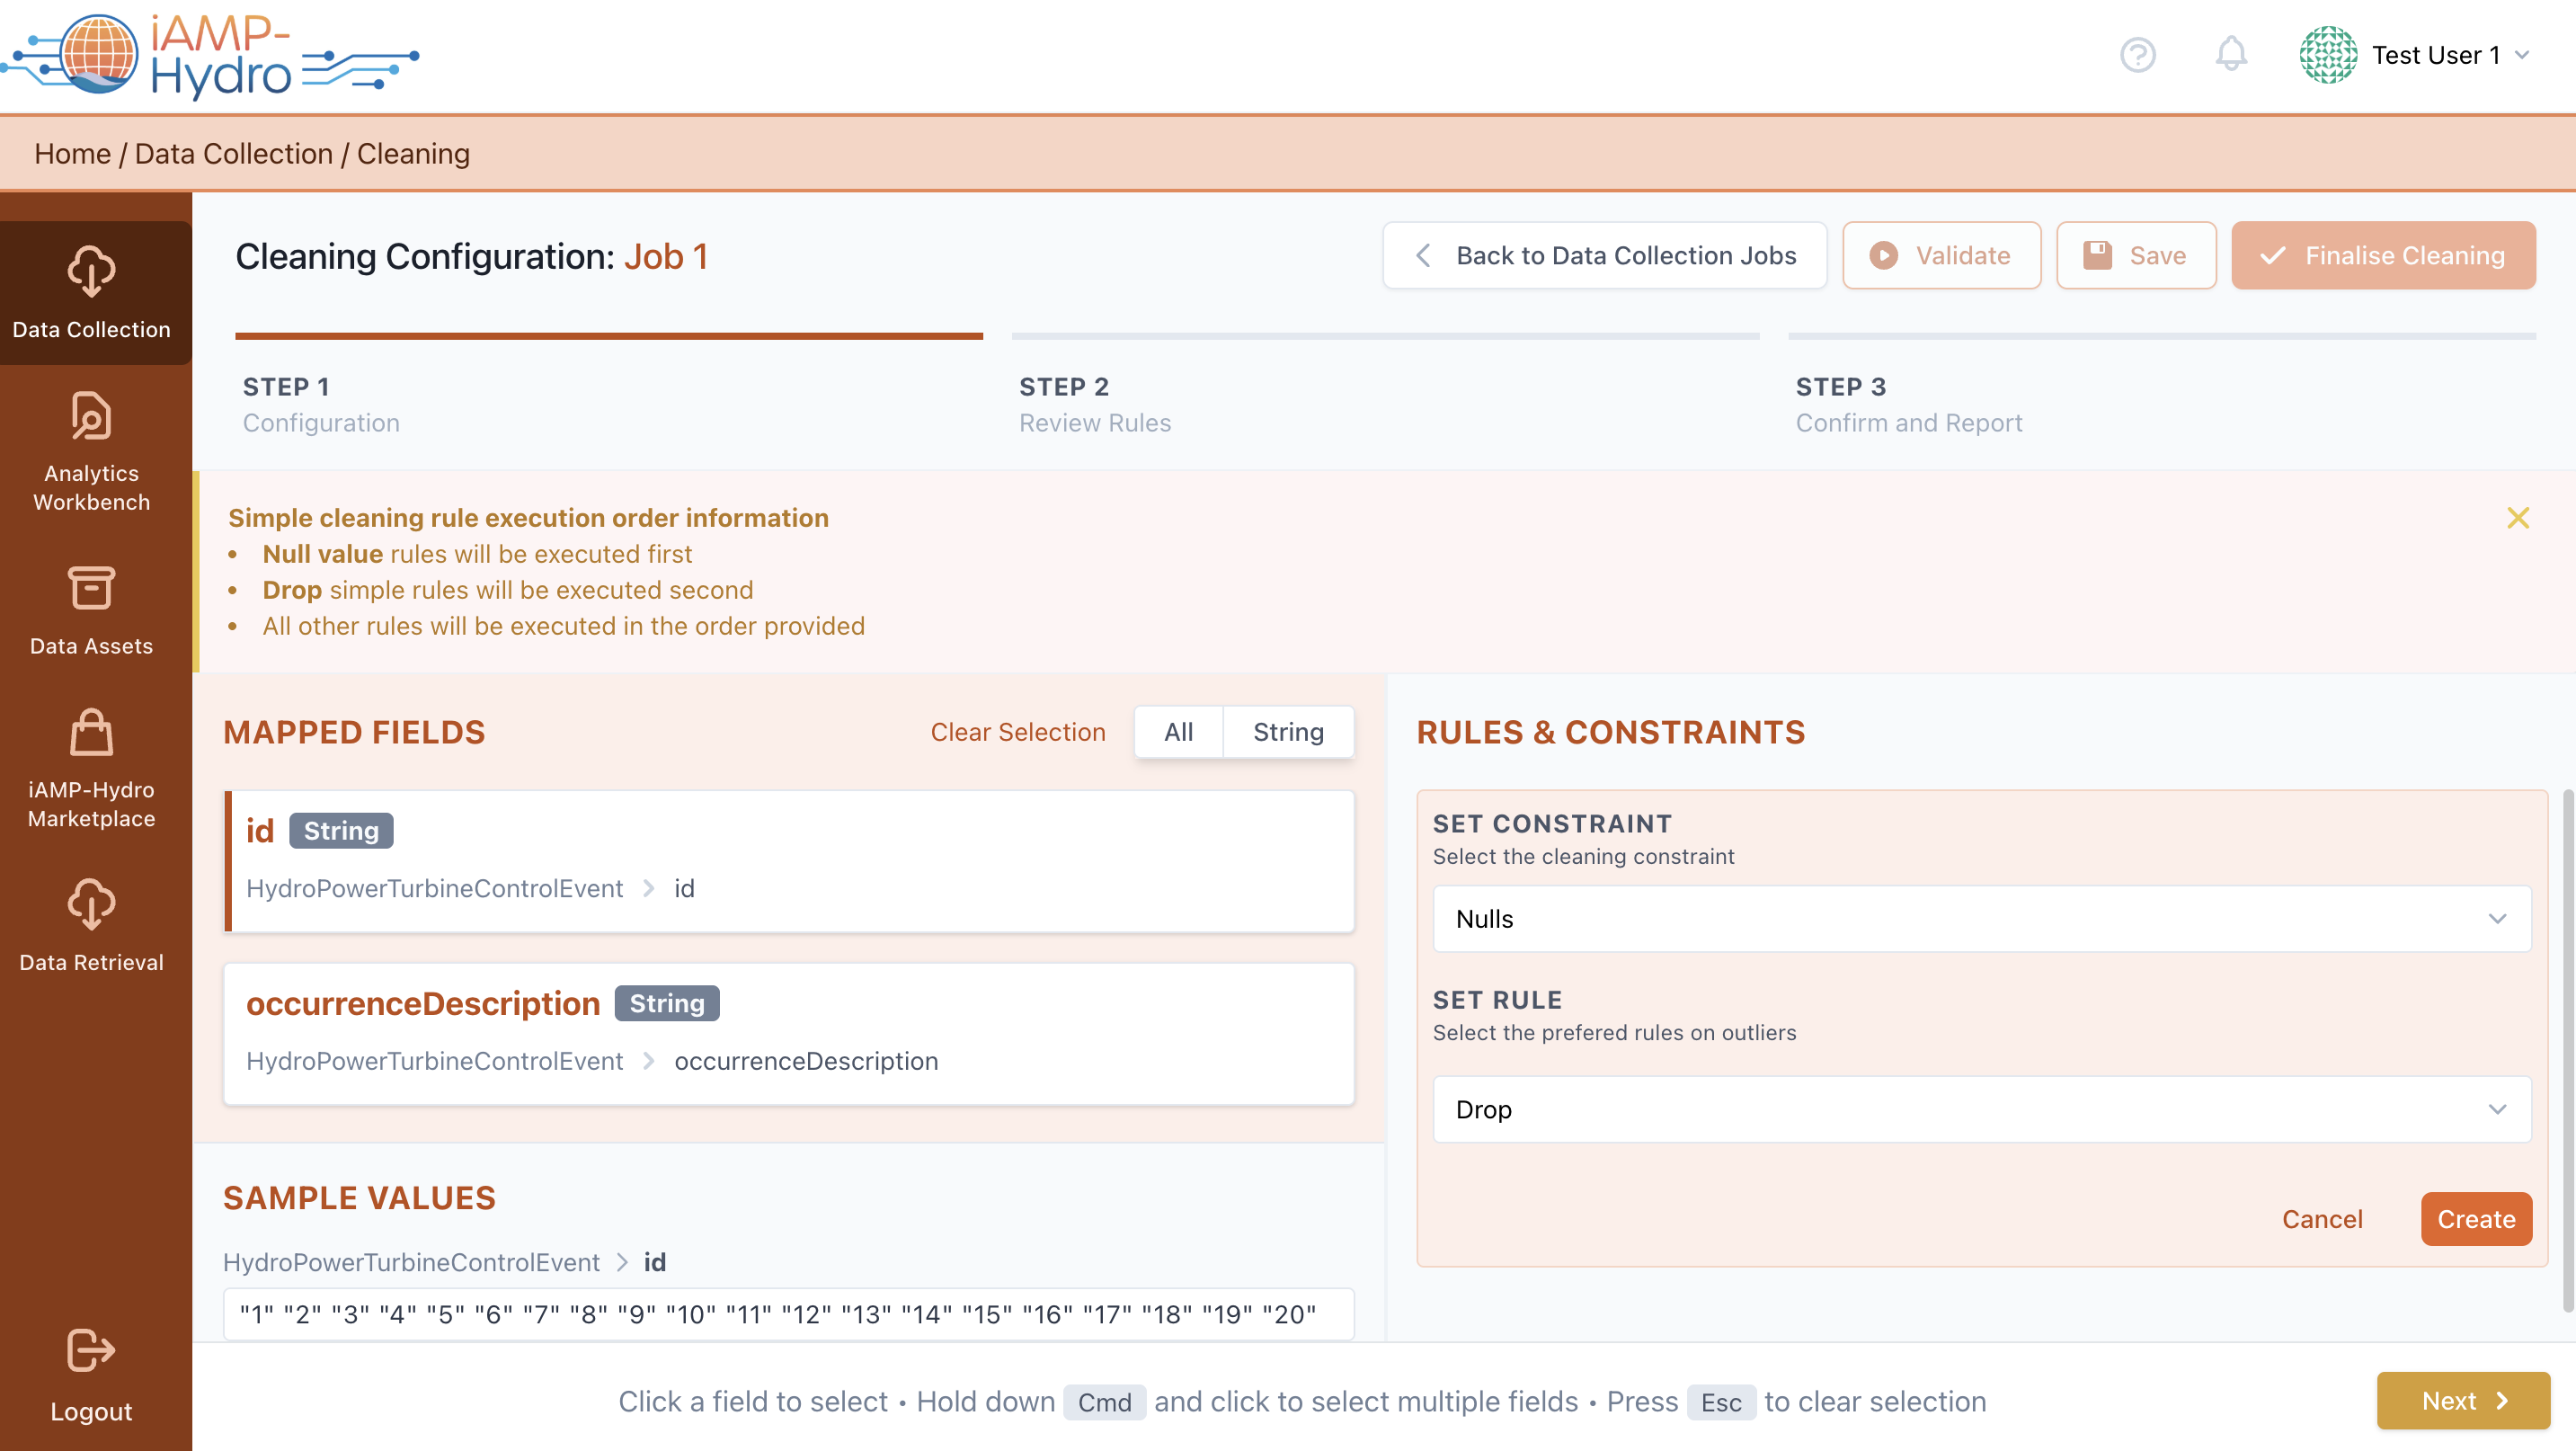
Then, you need to define how the cases that do not satisfy your cleaning rule will be handled, e.g. null values in the selected field will result in dropping the whole row or will be replaced by a predefined value, etc.
After adding each cleaning rule, you'll see a straightforward description of the intervention that will be performed in the data.
You also have the flexibility to introduce a new rule, modify or delete an existing one, or rearrange the order in which they're applied.
Upon finalizing your cleaning configuration by clicking the “Next” button, a sample run of the cleaning rules is executed to show you the interventions performed on your sample data and you may compare the results with the previous step (i.e. Mapping). In case you are satisfied with the sample run, you can proceed to the next step and view a summary of all cleaning rules that have been configured as displayed in the following figure.
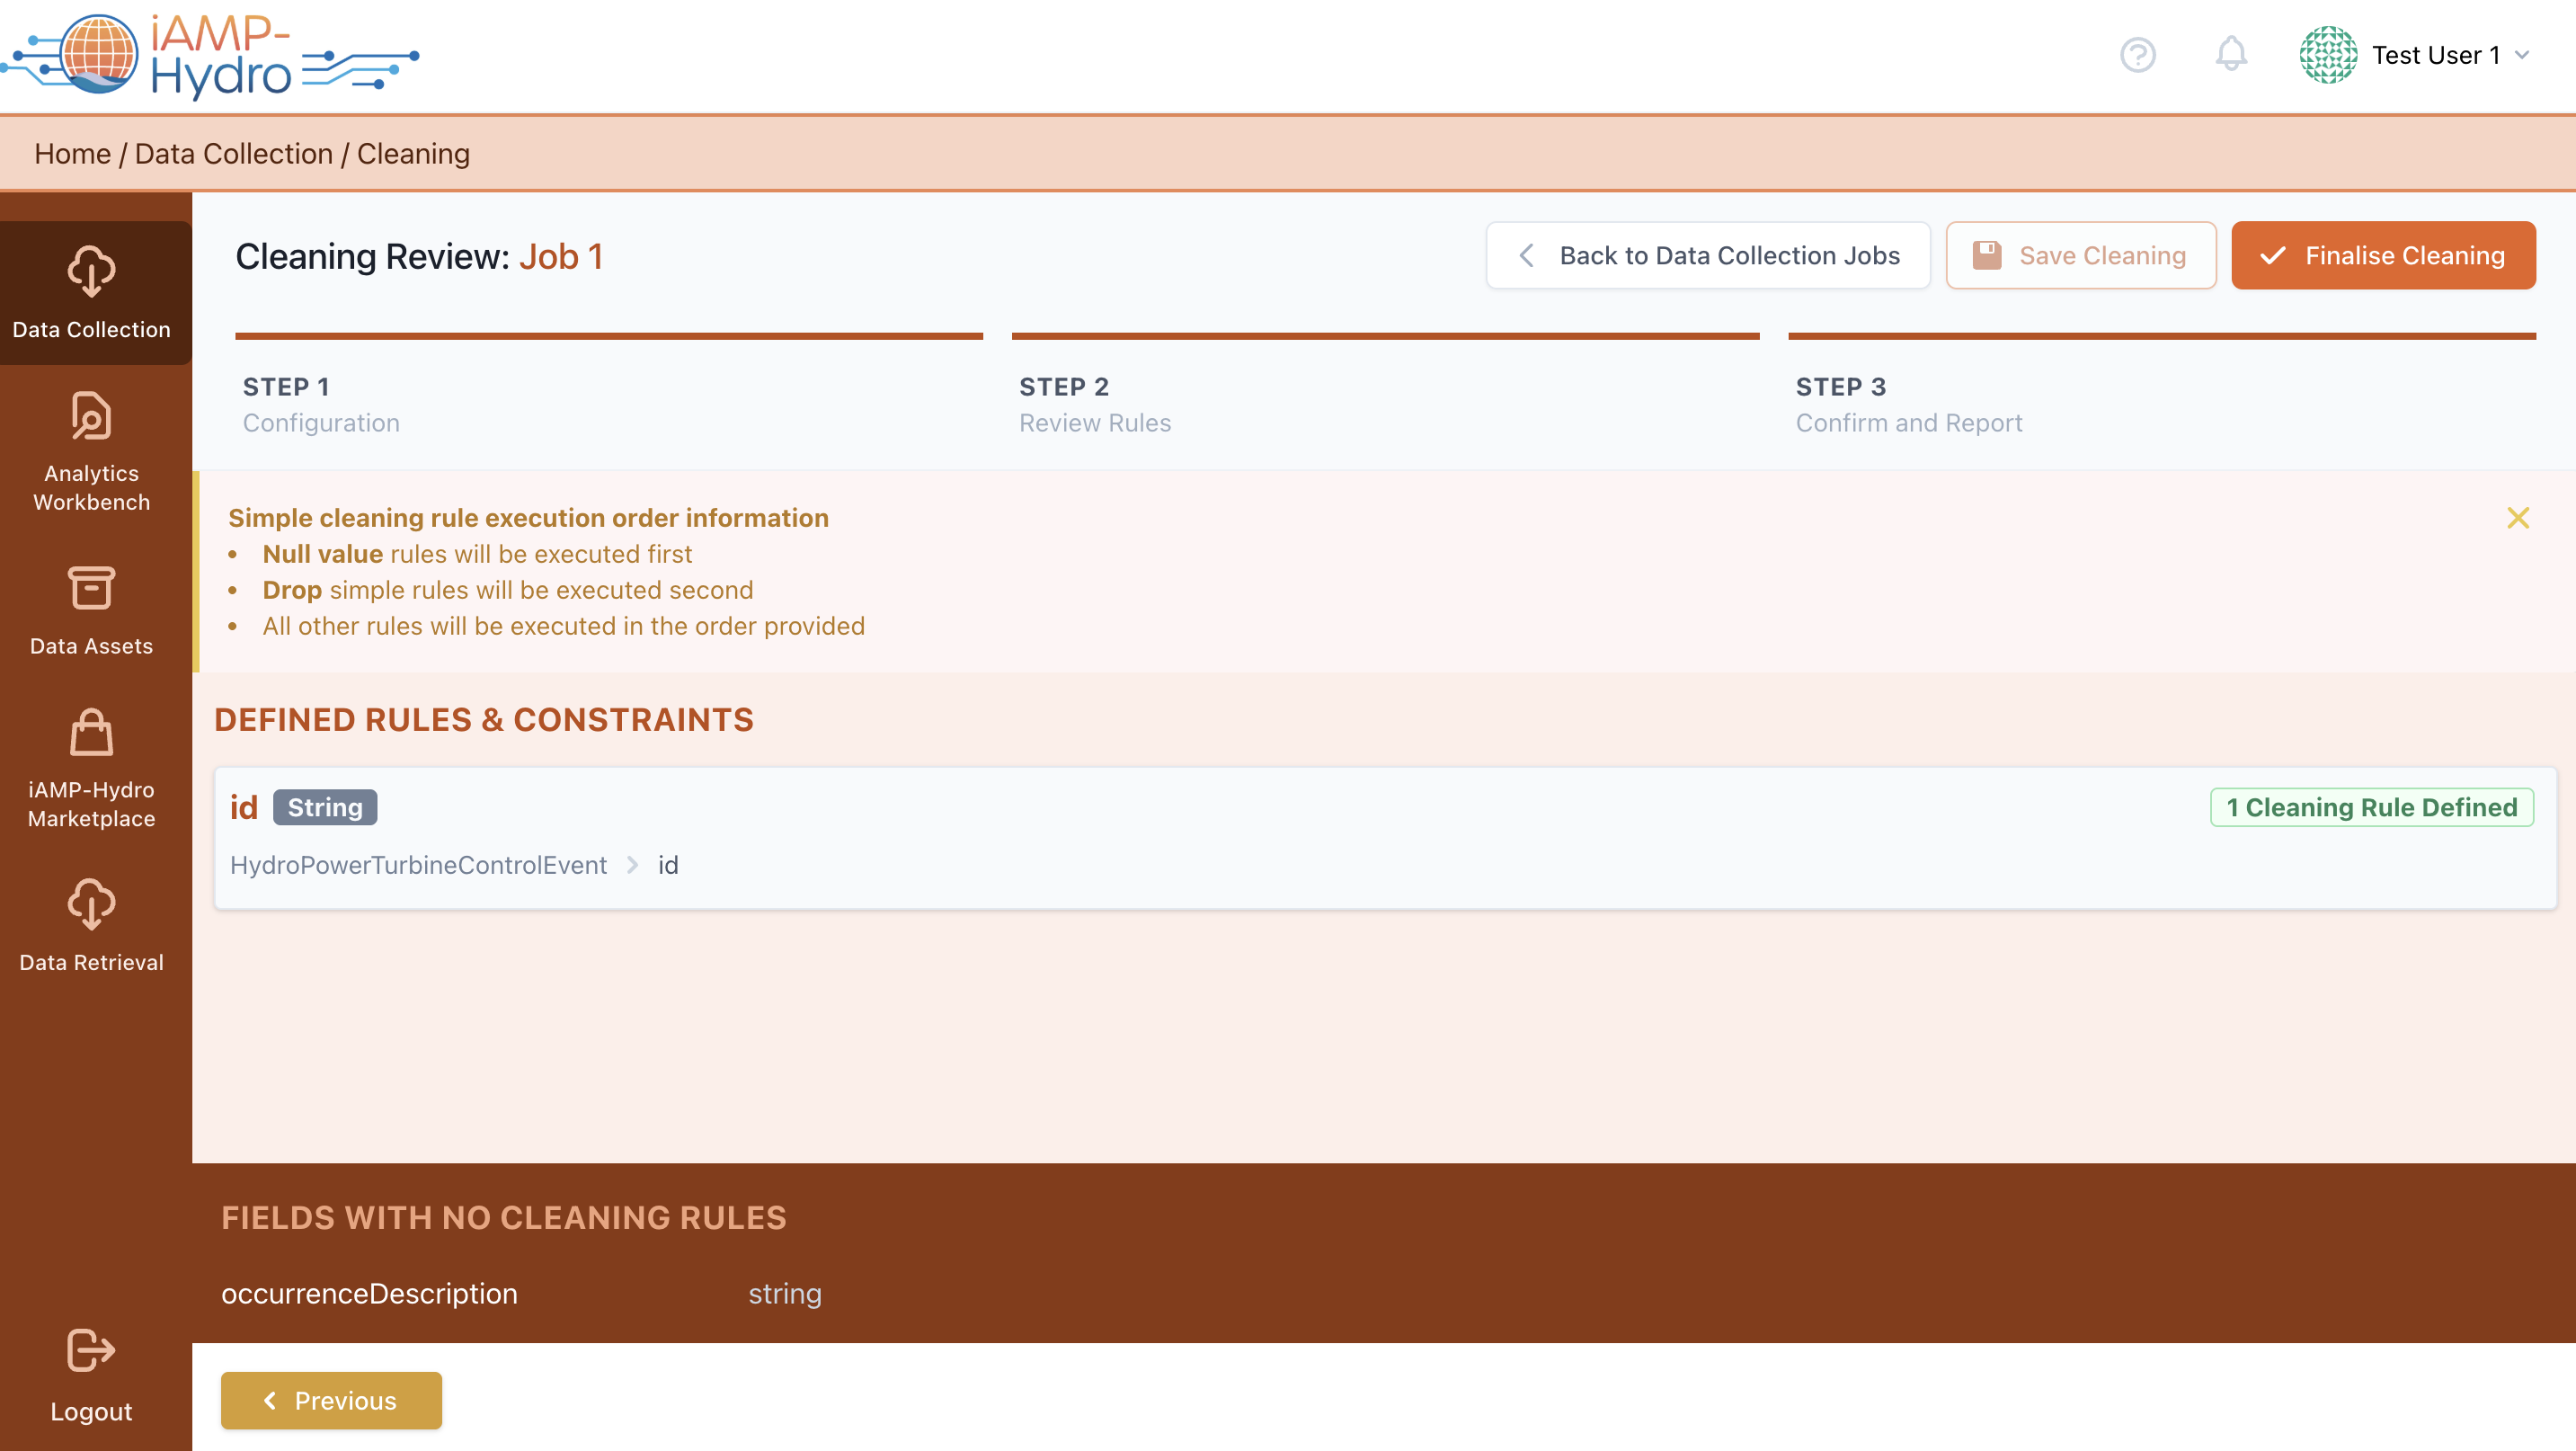
This process ensures your data is cleaned and prepared according to the standards and requirements of the iAM Platform, enhancing its quality and usability.
Configure the Loader Step
The final step in completing a data collection job involves the Loader Configuration. At this stage, users of the iAM Platform are prompted to specify a name for the asset (dataset) to be stored in the iAM Platform, along with a brief description of the contained data, as shown in the figure.

Once all necessary information about the asset is provided, users are notified that the configuration of the Data Collection Job is complete. They are then redirected to the Data Collection page, depicted in where they can view all initiated Data Collection Jobs along with their respective completion statuses.